
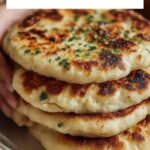
If you have ever dreamed of biting into warm, soft, and perfectly puffed bread straight from your kitchen, this Fluffy Greek Pita Bread Recipe will become your new best friend. With its pillowy texture and subtle, tangy flavor, this traditional Greek bread is incredibly versatile and just waiting to be filled with your favorite ingredients or enjoyed all on its own. This recipe walks you through every step to achieve those iconic pita pockets that are perfect for dipping, stuffing, or serving alongside your favorite Mediterranean dishes. Trust me, once you master this, you will never want store-bought pita again!
Ingredients You’ll Need
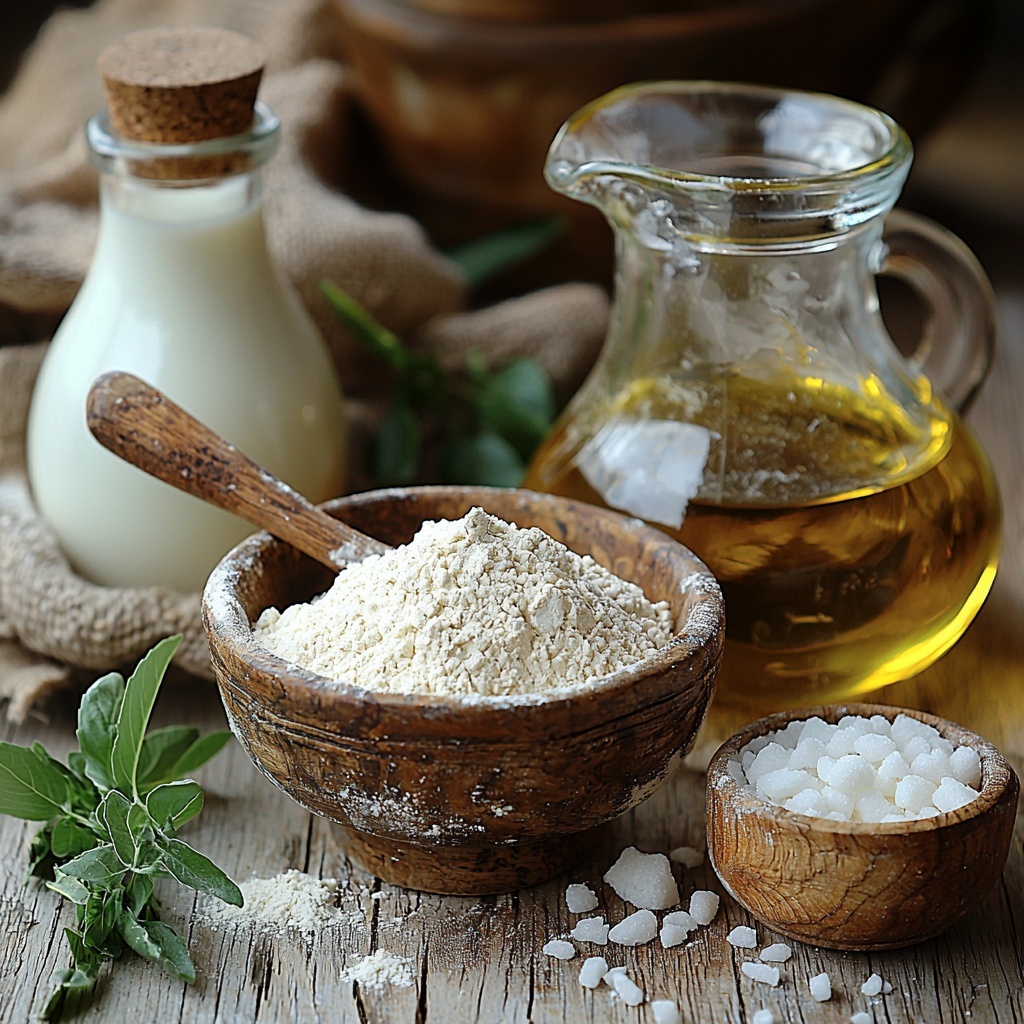
The magic of this Fluffy Greek Pita Bread Recipe lies in its simple yet carefully chosen ingredients. Each one plays a vital role in creating the bread’s soft texture, beautiful color, and that signature flavor that makes Greek pitas unforgettable.
- Bread flour (3 cups): Provides the gluten structure necessary for chewy, soft pitas with a great rise.
- Warm water (3/4 cup): Activates the yeast and hydrates the dough for a smooth texture.
- Warm whole milk (6 tbsp): Adds tenderness and a mild richness to the bread.
- Sugar (1 1/2 tsp): Feeds the yeast so it can do its magic in helping the dough rise properly.
- Active dry yeast (1 1/2 tsp): The powerhouse that makes your pita bread fluffy by creating air pockets.
- Olive oil (3 tbsp): Adds moisture and subtle flavor while contributing to the soft crumb.
- Salt (1 1/2 tsp): Essential for enhancing all the flavors and balancing the sweetness.
How to Make Fluffy Greek Pita Bread Recipe
Step 1: Combine Warm Liquids
Begin by adding the warm water and warm whole milk to a medium bowl. It’s important that the temperature is just right—very warm but not too hot—so your finger can stay in the water for a few seconds. This warmth is what awakens the yeast, setting the stage for that perfect rise.
Step 2: Activate the Yeast
Whisk the sugar into your warm liquid, then sprinkle in the yeast. Let this mixture sit for about 5 minutes until it becomes frothy and bubbly. This froth is your sign that the yeast is alive and kicking, ready to work its magic on the dough.
Step 3: Add Olive Oil and Salt
Next, whisk in the olive oil and salt to your yeast mixture. These ingredients add richness and depth to the dough, ensuring your pita bread has great flavor and a tender crumb.
Step 4: Mix and Knead the Dough
Using a wooden spoon, gradually stir in the bread flour until the dough comes together into a shaggy mass. Transfer it to a floured surface and knead vigorously for about 10 minutes until you feel the dough become smooth and elastic. This kneading develops the gluten structure, which is key for the fluffy texture you crave.
Step 5: First Rise
Place the kneaded dough back into the bowl, cover it tightly with plastic wrap, and put it in a warm spot. Let it rise until it doubles in size, about an hour and a half. This is the stage where your dough gets those lovely air pockets that puff up later during cooking.
Step 6: Divide and Shape
Once risen, turn the dough out onto a floured work area and gently shape it into a circle for even division. Cut the dough into 6 equal pieces. The dough might be a bit sticky; don’t hesitate to wet your hands or dust with extra flour to keep things manageable.
Step 7: Rest Before Rolling
Form each piece into a rough circle and place them on a baking sheet lined with parchment paper. Cover with a clean tea towel and let them rest for 1 hour. This second rise allows the dough circles to relax and puff up beautifully when cooked.
Step 8: Roll Out the Dough Circles
After resting, use a rolling pin to roll each dough piece into about a 5-inch wide circle. Keeping them uniform ensures even cooking and consistent fluffiness across all the pitas.
Step 9: Cook to Perfection
Heat a cast iron or heavy non-stick skillet over medium heat. Place a rolled-out dough circle in the skillet and cook for 30 seconds on one side, then flip and cook 30 seconds on the other side. Now drizzle about 1 tablespoon of olive oil on both sides of the pita and continue cooking for 5 minutes, flipping every minute. Your pita will puff up and turn a beautiful deep golden brown. Repeat with all the pieces and get ready to enjoy!
How to Serve Fluffy Greek Pita Bread Recipe
Garnishes
Nothing beats the fresh aroma of oregano sprinkled over warm pita bread. You can also try a light drizzle of good-quality olive oil or a sprinkle of sesame seeds right after cooking to add an irresistible hint of earthiness and texture.
Side Dishes
This Fluffy Greek Pita Bread Recipe pairs wonderfully with traditional Mediterranean sides like our best ever tzatziki, hummus, or baba ganoush. It also complements grilled meats, fresh salads, or hearty stews, creating a meal that’s bursting with flavors and textures.
Creative Ways to Present
Serve these pitas as mini artisanal sandwich pockets stuffed with roasted veggies, spiced lamb, or falafel. For a twist, cut them into triangles and use as dippers for bold dips at your next gathering—it’s always a crowd pleaser!
Make Ahead and Storage
Storing Leftovers
Let your pita bread cool completely before storing it in an airtight container or ziplock bag at room temperature. Leftover pitas stay fresh and soft for up to 2 days, making them perfect for quick snacks or lunches.
Freezing
To keep your pitas longer, stack them with parchment paper in between and place them in a freezer-safe bag. Frozen pita bread retains its quality for up to a month and thaws quickly at room temperature or in the microwave.
Reheating
Reheat your pita bread by wrapping it in a damp paper towel and microwaving for 20 seconds or warming briefly in a skillet. This will revive that soft, fluffy texture and make it taste freshly baked all over again.
FAQs
Can I use all-purpose flour instead of bread flour?
Yes, you can use all-purpose flour, though bread flour is preferred because it contains more protein, which helps with the chewiness and puffing. All-purpose flour will still yield tasty pita but might be slightly less fluffy.
What causes the pita bread to puff up?
The puffing happens when water in the dough turns into steam in the hot skillet. This steam separates the layers inside, creating the signature pocket. Proper kneading and the right cooking temperature are crucial for this effect.
Can I make this recipe vegan?
Absolutely! Simply substitute the whole milk with a plant-based milk like almond or oat milk warmed to the same temperature. The rest of the ingredients are naturally vegan-friendly.
How do I know when the yeast is active?
If the yeast mixture becomes frothy and bubbles form after letting it sit for 5 minutes, it’s active and ready to go. If nothing happens, you likely need to use fresher yeast or check your water temperature.
Why do I need two rises for the dough?
The first rise builds flavor and develops the dough structure by creating bubbles, while the second rise relaxes those bubbles and ensures the pitas puff up nicely during cooking. Skipping either can result in denser bread.
Final Thoughts
This Fluffy Greek Pita Bread Recipe is a treasure to have in your culinary repertoire. It’s approachable, rewarding, and perfect for any occasion where you want a fresh, homemade touch. Believe me, once you taste these soft, golden pockets warm from the skillet, you’ll never go back to store-bought again. So, grab your ingredients and get baking—you’re in for a delicious journey!
Print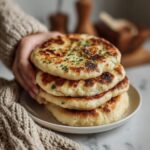
Fluffy Greek Pita Bread Recipe
- Prep Time: 10 minutes
- Cook Time: 35 minutes
- Total Time: 1 hour 45 minutes
- Yield: 6 pitas
- Category: Bread
- Method: Stovetop
- Cuisine: Greek
Description
This Fluffy Greek Pita Bread recipe yields soft, pillowy pitas with a slightly crispy exterior, perfect for stuffing or dipping. Made with simple ingredients like bread flour, warm water, milk, yeast, sugar, olive oil, and salt, these homemade pitas puff up beautifully when cooked on a skillet, delivering authentic Mediterranean flavors right at home.
Ingredients
Dough Ingredients
- 3 cups bread flour (or all-purpose flour)
- 3/4 cup warm water (very warm to the touch, but not too hot)
- 6 tbsp warm whole milk
- 1 1/2 tsp sugar
- 1 1/2 tsp active dry yeast
- 3 tbsp olive oil
- 1 1/2 tsp salt
Instructions
- Activate Yeast: In a medium bowl, combine warm water and warm whole milk, ensuring the temperature is very warm but tolerable to touch. Whisk in sugar first, then sprinkle in the active dry yeast. Let this mixture sit for 5 minutes until it becomes frothy, indicating the yeast is active.
- Add Oil and Salt: Whisk the olive oil and salt into the frothy yeast mixture to incorporate the flavors evenly.
- Form Dough: Using a wooden spoon, gradually stir in the bread flour until a shaggy dough forms. Transfer it onto a floured surface and knead vigorously for 10 minutes until the dough is smooth and elastic.
- First Rise: Place the kneaded dough into a clean bowl, cover it tightly with plastic wrap, and let it rise in a warm spot until it doubles in size, about 1 1/2 hours.
- Divide Dough: Once risen, place the dough back on a floured surface, shape it into a circle, and divide into 6 equal pieces. If sticky, wet your hands and dust the dough with flour as needed for easier handling.
- Second Rise: Shape each piece into a circle and arrange them on a parchment-lined baking sheet. Cover with a tea towel and allow the dough circles to rest and rise for 1 additional hour.
- Roll Out Pitas: After the second rise, roll each dough piece into a 5-inch wide circle, preparing them for cooking.
- Cook Pitas: Heat a cast iron or heavy-bottomed non-stick skillet over medium heat. Place one rolled-out dough circle in the pan and cook for 30 seconds on one side, then flip and cook another 30 seconds. Drizzle about 1 tablespoon of olive oil over both sides of the pita, then continue cooking for 5 minutes, flipping every minute to ensure even browning and puffing. Pitas should be deep golden brown and puffed up.
- Repeat Cooking: Repeat the cooking process with the remaining dough circles until all six pitas are cooked. Serve warm, optionally topped with fresh oregano and your favorite tzatziki sauce.
Notes
- Use bread flour for best texture, but all-purpose flour works as a substitute.
- The temperature of the water and milk is crucial; too hot can kill the yeast, too cold will prevent activation.
- Kneading the dough thoroughly for 10 minutes develops gluten for a soft and elastic texture.
- If the dough is sticky during shaping, wet your hands and sprinkle a little flour to prevent sticking.
- A cast iron skillet or a heavy non-stick pan ensures even heat distribution and proper puffing of the pitas.
- Drizzling olive oil during cooking helps develop a crispy exterior and rich flavor.
- Allowing multiple rises contributes to the fluffiness and lightness of the pita bread.
