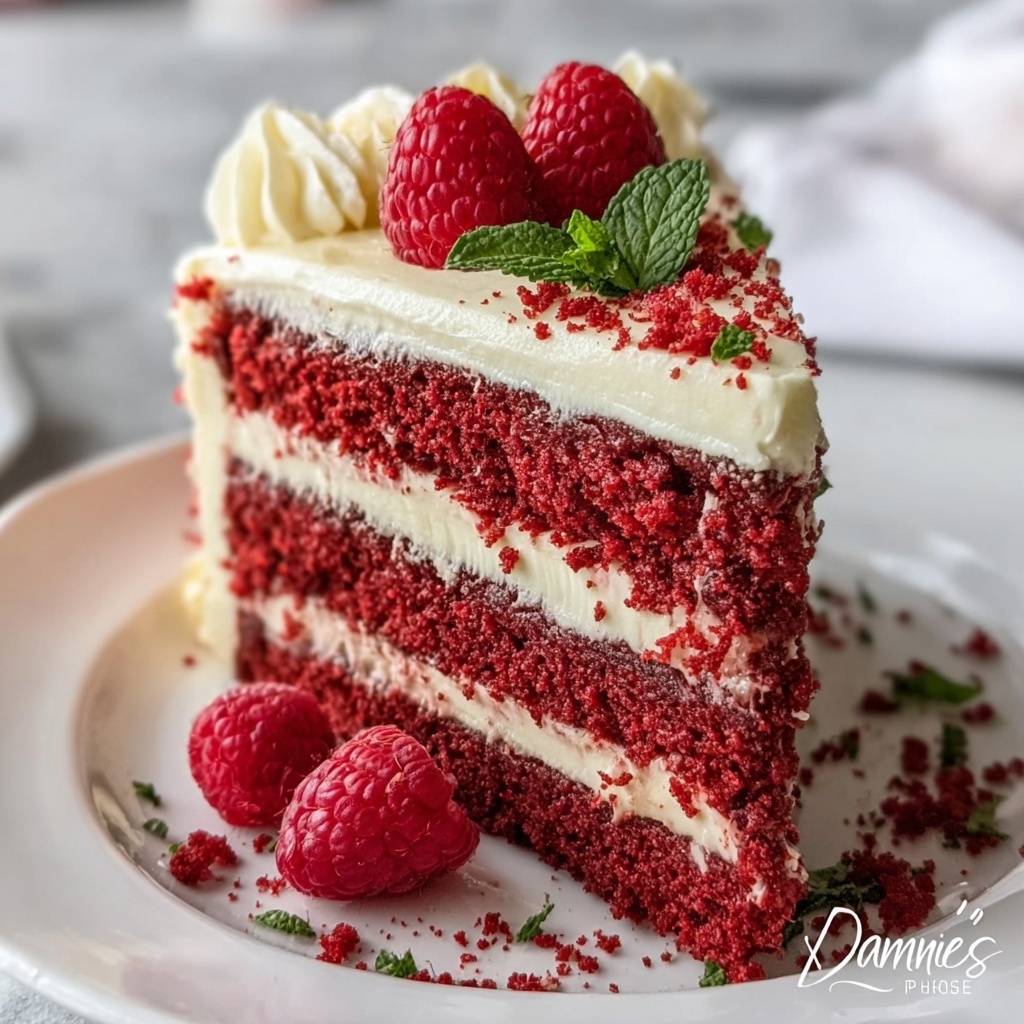
If you’ve ever dreamed of a dessert that captures the rich, velvety texture of red velvet cake combined with the creamy decadence of cheesecake, look no further. This Red Velvet Cheesecake Layer Cake Recipe is exactly that dream come true, layering bold flavors and silky textures into one stunning showstopper. The vibrant red cake with its hint of cocoa pairs beautifully with the luscious cheesecake center, all enveloped in fluffy cream cheese frosting—it’s a true celebration in every bite. Whether you’re impressing guests or treating yourself, this cake promises to be the centerpiece that everyone remembers.
Ingredients You’ll Need
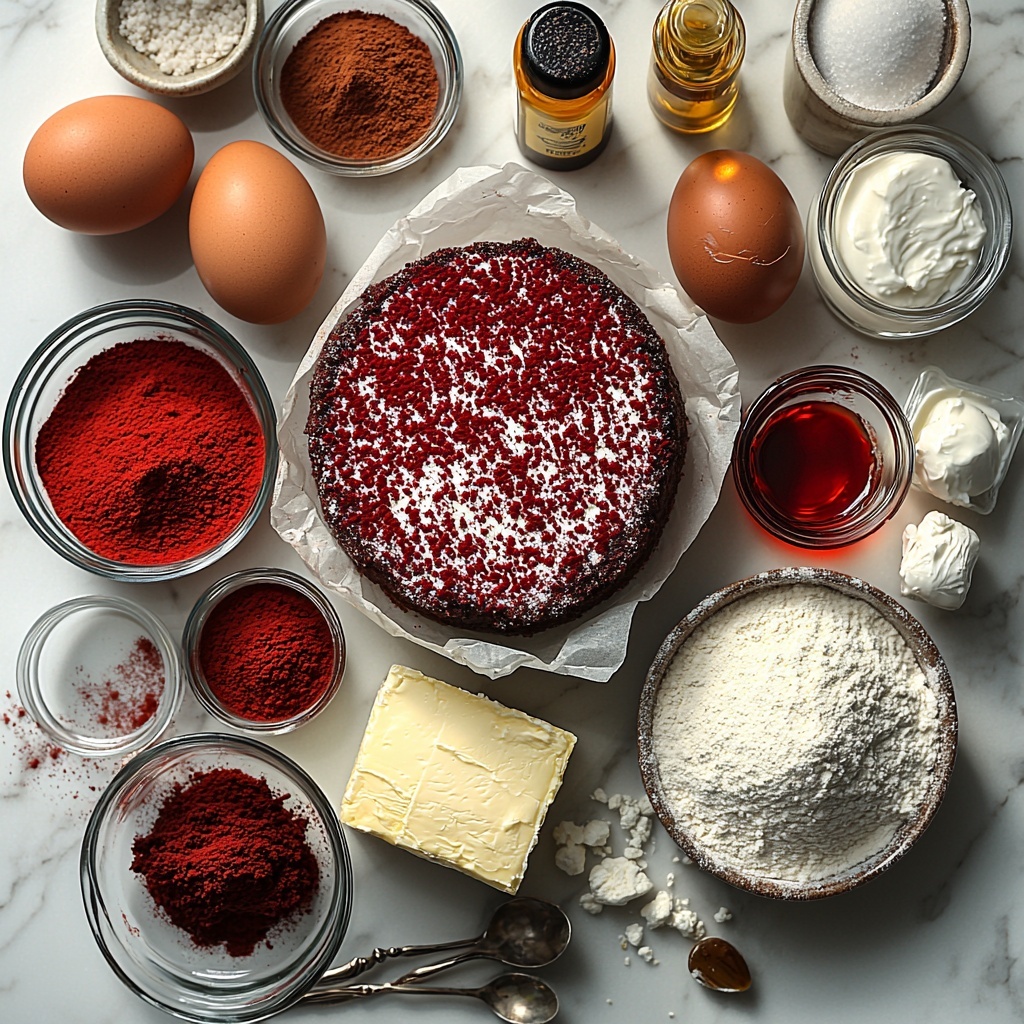
This recipe brings together simple, classic ingredients that each play a crucial role in creating the perfect balance of texture, flavor, and color. From the all-purpose flour that forms the cake’s structure to the cream cheese that makes the cheesecake and frosting rich and tangy, every component matters.
- All-purpose flour: The foundation for the cake’s soft yet sturdy crumb.
- Granulated sugar: Sweetness that also aids in tenderizing the cake layers.
- Baking soda: The leavening agent ensuring a light, airy cake.
- Salt: Enhances all the flavors, balancing sweetness perfectly.
- Cocoa powder: Adds a subtle chocolate undertone to deepen the red velvet flavor.
- Vegetable oil: Keeps the cake moist and tender without overpowering flavor.
- Buttermilk: Brings tang and moisture, helping achieve that signature red velvet softness.
- Eggs: Bind everything together—room temperature for best texture.
- Red food coloring: The star that gives this cake its iconic vibrant hue.
- Vanilla extract: Adds warmth and depth to both cake and frosting.
- White vinegar: Reacts with baking soda to give a lighter crumb and enhances the red color.
- Cream cheese: For the cheesecake layer and frosting, bringing creamy tanginess and richness.
- Sour cream: Makes the cheesecake ultra smooth and moist.
- Unsalted butter: Key for a luscious, creamy frosting texture.
- Powdered sugar: Sweetens the frosting while keeping it fluffy.
How to Make Red Velvet Cheesecake Layer Cake Recipe
Step 1: Prepare the Red Velvet Cake Batter
Start by preheating your oven and preparing your pans properly—greasing and flouring is key to easy cake removal. Next, sift together the dry ingredients to ensure even distribution. Separately, whisk all your wet ingredients including the buttermilk and that gorgeous red food coloring until smooth and vibrant. Slowly combine the wet with the dry just until you have a smooth batter; overmixing can lead to a dense cake, so gentle folding is your friend here.
Step 2: Bake the Red Velvet Cake Layers
Divide the batter evenly between two 9-inch round pans and slide them into the preheated oven. Baking takes about 25 to 30 minutes, but start checking at the 25-minute mark by inserting a toothpick into the center—it should come out clean or with just a few crumbs. Allow the cakes to cool in their pans briefly before transferring to a wire rack; this step helps prevent the layers from breaking apart.
Step 3: Make the Cheesecake Layer
Reduce the oven temperature and get your springform pan ready. Beat the cream cheese until it’s perfectly smooth—this ensures your cheesecake will have that dreamy texture everyone loves. Incorporate sugar and vanilla, then add eggs one by one, mixing gently after each addition to keep the batter light. A little sour cream rounds out the flavor and adds moisture. Pour the batter into the springform pan and bake until the edges look set but the center still jiggles slightly—this ensures a creamy finish. After baking, let it cool slowly inside the oven, then refrigerate to firm up overnight or at least four hours.
Step 4: Prepare the Cream Cheese Frosting
While your cheesecake chills, beat together softened butter and cream cheese until silky smooth and fluffy. Gradually blend in powdered sugar along with vanilla extract until the frosting is luscious and sweet but balanced. This frosting will hold your entire cake together and add a decadent finish.
Step 5: Assemble the Red Velvet Cheesecake Layer Cake Recipe
Now comes the fun part: layering this masterpiece. Place one red velvet layer on your cake stand, slather it with a generous amount of cream cheese frosting, then carefully add the chilled cheesecake layer on top. Spread another layer of frosting before topping it with the second red velvet cake. Finally, cover the whole cake with the remaining frosting, smoothing it out evenly for a polished look. Add your favorite decorations if you feel creative!
How to Serve Red Velvet Cheesecake Layer Cake Recipe
Garnishes
A dusting of cocoa powder or a few fresh raspberries can perfectly complement this cake’s rich colors and flavors. Edible flowers, chocolate shavings, or even a sprinkle of crushed pecans add delightful texture and visual interest, making each slice a feast for the eyes as well as the palate.
Side Dishes
This cake is a dessert star that pairs beautifully with fresh whipped cream or a simple scoop of vanilla bean ice cream. For an added fruity contrast, serve alongside a bowl of macerated berries or a tart cherry compote—both cut through the richness with their natural brightness.
Creative Ways to Present
Elevate your presentation by stacking the cake layers on a decorative cake stand or slicing it into petite individual servings for a party platter. Try layering some fresh strawberries or edible gold flakes between slices on the plate to impress guests with both flavor and flair.
Make Ahead and Storage
Storing Leftovers
Keep any leftover cake tightly covered in the refrigerator to maintain moisture and flavor. A cake dome or airtight container works best to prevent the frosting from absorbing other odors and to keep the layers fresh and ready to enjoy for a few days.
Freezing
You can freeze the assembled cake wrapped securely with plastic wrap and then aluminum foil. Freeze for up to two months and thaw overnight in the fridge before serving to preserve its creamy texture and fresh taste.
Reheating
Because this is a rich, chilled cake, it’s best enjoyed cold or at room temperature. Simply take it out of the fridge about 30 minutes before serving to take the chill off and bring out the full flavor without compromising texture.
FAQs
Can I use regular milk instead of buttermilk?
While you can substitute regular milk mixed with a tablespoon of vinegar or lemon juice to mimic buttermilk, using actual buttermilk in the Red Velvet Cheesecake Layer Cake Recipe guarantees that subtle tang and moisture that are signature to red velvet cakes.
Is it okay to bake the cake layers and cheesecake layer on the same day?
Absolutely! Just remember to bake the red velvet layers first and let them cool while the cheesecake is baking at a lower temperature. This sequencing makes sure both components turn out perfectly without overbaking.
What if I don’t have a springform pan for the cheesecake?
A springform pan is ideal for easy removal of the cheesecake layer, but if you don’t have one, try using a well-greased cake pan and carefully loosen the edges with a knife before unmolding. Just take extra care as cheesecake can be delicate.
How can I troubleshoot a cracked cheesecake layer?
Cracking usually happens if the cheesecake is overbaked or cooled too quickly. Baking it until just set and then allowing it to cool gradually in the turned-off oven helps prevent cracks. Also, make sure to chill it for several hours before assembling the cake.
Can I make the frosting ahead of time?
Yes, you can prepare the cream cheese frosting a day in advance and keep it refrigerated. Bring it to room temperature and give it a quick whip before frosting your cake so it spreads smoothly and retains its luscious texture.
Final Thoughts
This Red Velvet Cheesecake Layer Cake Recipe is more than just a dessert—it’s a celebration of textures and flavors that always brings smiles. Whether it’s a special occasion or a weekend treat, don’t hesitate to dive in and share this recipe with friends and family. Trust me, once you experience the magic of that cheesecake nestled between vibrant red velvet layers, you’ll want this cake in your baking repertoire forever.
Print
Red Velvet Cheesecake Layer Cake Recipe
- Prep Time: 30 minutes
- Cook Time: 1 hour 20 minutes
- Total Time: 6 hours 20 minutes
- Yield: 12 servings
- Category: Dessert
- Method: Baking
- Cuisine: American
Description
This Red Velvet Cheesecake Layer Cake is a stunning dessert combining the rich, moist texture of classic red velvet cake with a creamy, luscious cheesecake layer in the middle, all enveloped in a smooth cream cheese frosting. Perfect for special occasions, this cake offers a beautiful balance of flavors and textures that will impress any crowd.
Ingredients
For the Red Velvet Cake:
- 2 1/2 cups all-purpose flour
- 1 1/2 cups granulated sugar
- 1 teaspoon baking soda
- 1 teaspoon salt
- 1 teaspoon cocoa powder
- 1 1/2 cups vegetable oil
- 1 cup buttermilk, at room temperature
- 2 large eggs, at room temperature
- 2 tablespoons red food coloring
- 1 teaspoon vanilla extract
- 1 teaspoon white vinegar
For the Cheesecake Layer:
- 16 ounces cream cheese, softened
- 1 cup granulated sugar
- 1 teaspoon vanilla extract
- 3 large eggs
- 1/4 cup sour cream
For the Cream Cheese Frosting:
- 1 cup unsalted butter, softened
- 16 ounces cream cheese, softened
- 4 cups powdered sugar
- 2 teaspoons vanilla extract
Instructions
- Preheat and Prepare Pans: Preheat the oven to 350°F (175°C). Grease and flour two 9-inch round cake pans and one 9-inch springform pan to prevent sticking.
- Mix Dry Ingredients for Cake: In a large bowl, sift together the all-purpose flour, granulated sugar, baking soda, salt, and cocoa powder. Set aside the dry mixture.
- Combine Wet Ingredients for Cake: In another bowl, whisk together the vegetable oil, buttermilk, eggs, red food coloring, vanilla extract, and white vinegar until the mixture is smooth and fully incorporated.
- Make Cake Batter: Pour the wet ingredients into the dry ingredients and gently mix until just combined and the batter is smooth, taking care not to overmix.
- Bake Cake Layers: Divide the batter evenly between the two prepared 9-inch round cake pans. Bake in the preheated oven for 25-30 minutes or until a toothpick inserted into the center comes out clean. Allow the cakes to cool in the pans for 10 minutes, then transfer to wire racks to cool completely.
- Prepare Cheesecake Batter: Reduce oven temperature to 325°F (160°C). Beat the softened cream cheese in a large bowl until smooth. Add the sugar and vanilla extract and mix well to combine.
- Add Eggs and Sour Cream to Cheesecake: Gradually add the eggs one at a time into the cream cheese mixture, mixing just until incorporated after each addition. Finally, mix in the sour cream until the batter is smooth.
- Bake Cheesecake Layer: Pour the cheesecake batter into the prepared 9-inch springform pan. Bake for 45-50 minutes, or until the edges are set but the center still has a slight jiggle. Turn off the oven, leave the cheesecake inside with the door ajar, and let it cool for 1 hour. Afterwards, chill the cheesecake in the refrigerator for at least 4 hours or overnight to fully set.
- Make Cream Cheese Frosting: Beat the softened butter and cream cheese together until creamy and smooth. Gradually add the powdered sugar and vanilla extract, beating continuously until the frosting is smooth, fluffy, and ready to spread.
- Assemble the Cake: Place one red velvet cake layer on a serving platter. Spread an even layer of the cream cheese frosting over the top. Place the chilled cheesecake layer on top of the frosting. Spread another layer of cream cheese frosting over the cheesecake, then top with the second red velvet cake layer.
- Frost the Cake: Cover the top and sides of the entire cake with the remaining cream cheese frosting, smoothing it out evenly. Decorate as desired.
- Serve: Slice the cake and serve to enjoy the perfect combination of red velvet cake, cheesecake, and creamy frosting.
Notes
- Ensure all eggs and dairy are at room temperature before mixing to help achieve a smooth batter.
- Do not overmix the cake batter to keep the cake tender and light.
- Use a water bath for the cheesecake for extra creaminess, if desired.
- Chilling the cheesecake layer thoroughly before assembly prevents it from breaking or slipping when assembling the cake.
- This cake is best served within 2-3 days and should be stored in the refrigerator due to the cream cheese components.

