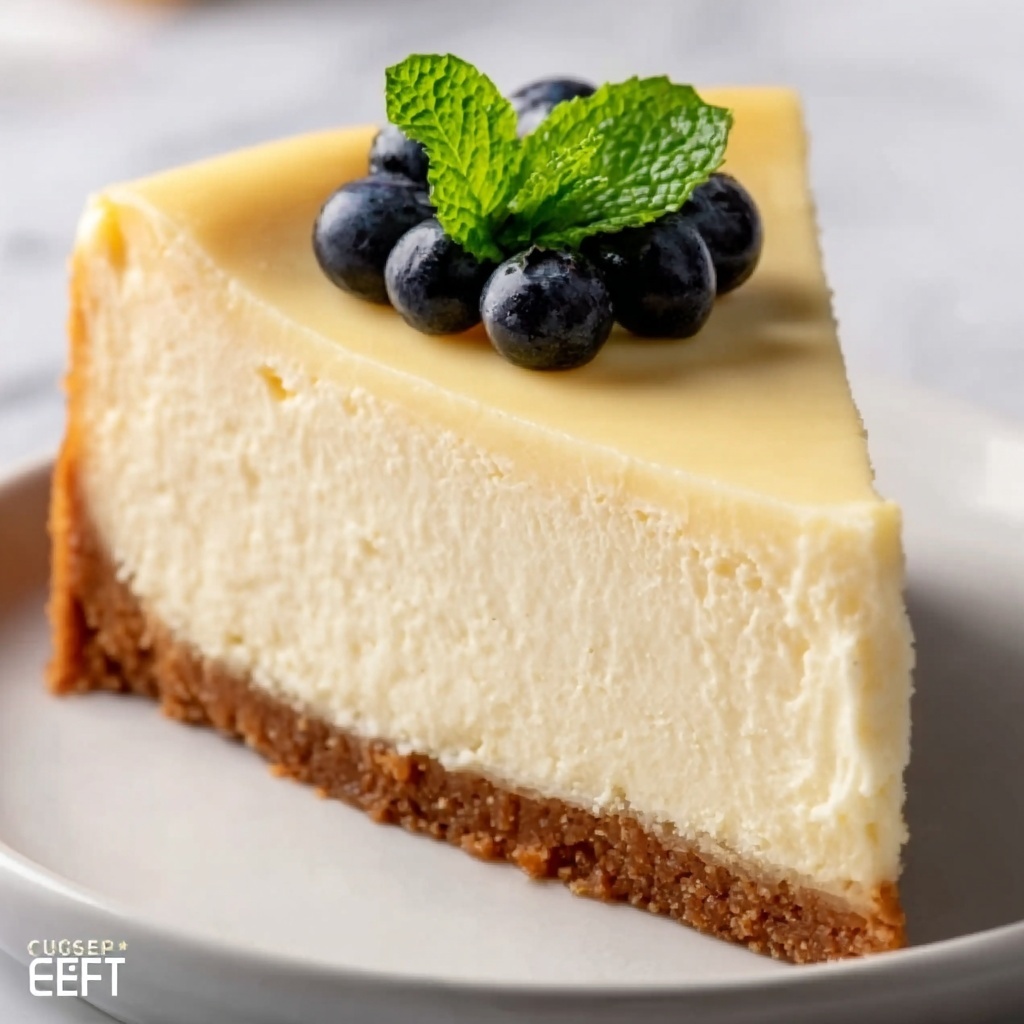
If you have ever dreamed of a dessert that is luxuriously smooth, irresistibly creamy, and baked without a single crack, then look no further than this Creamy Classic Cheesecake: Quick, Easy & No Cracks! Recipe. This cheesecake brings all the traditional flavors you love with a foolproof method that guarantees perfection every time. Whether you’re a seasoned baker or a total beginner, you’ll be amazed at how simple and rewarding it is to make this luscious, melt-in-your-mouth treat that will impress family and friends alike.
Ingredients You’ll Need
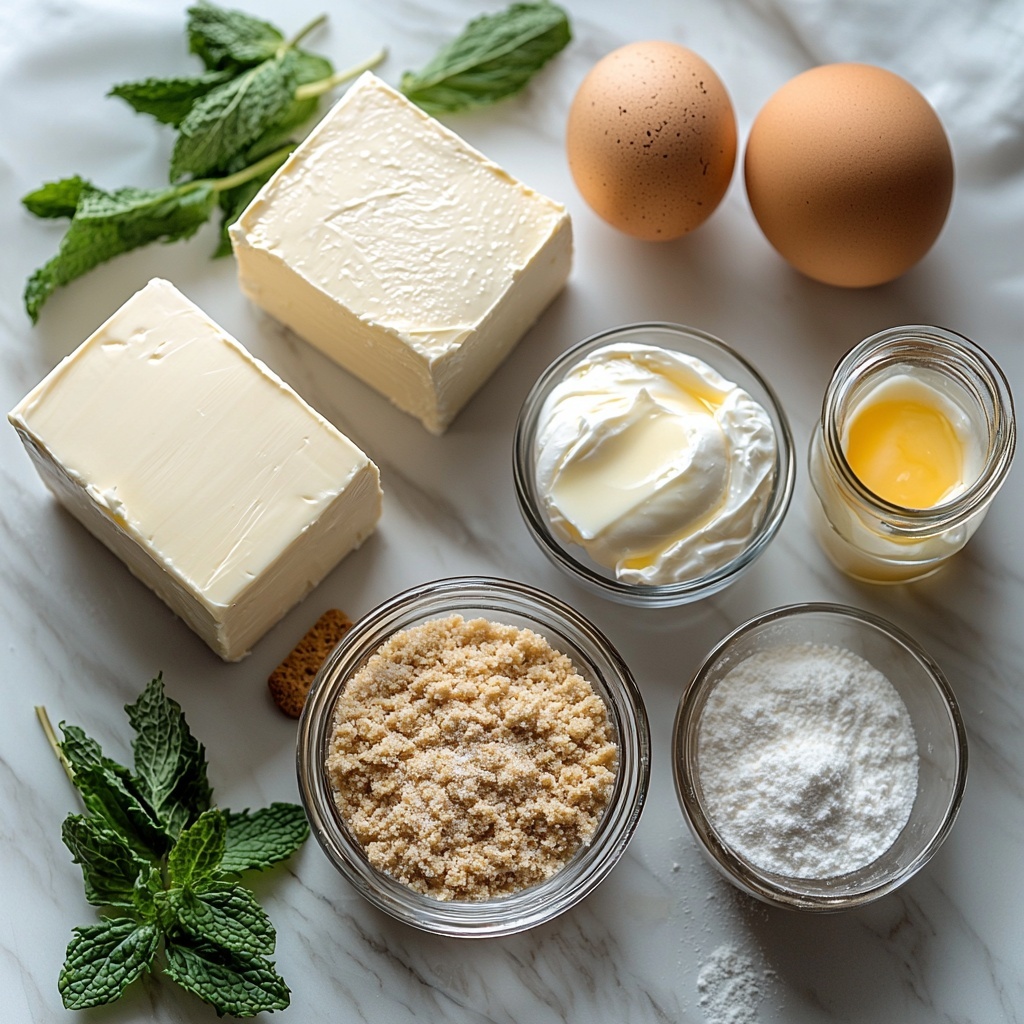
Every great cheesecake starts with a handful of simple, quality ingredients that work together to create that perfect texture and flavor balance. From the creamy richness of full-fat cream cheese to the buttery, crunchy crust, each component plays a crucial role in bringing this dessert to life.
- Full-fat cream cheese (2 blocks, 8 ounces each): The centerpiece of our cheesecake, providing that classic creamy, tangy flavor and smooth texture.
- Granulated sugar (1 cup plus ¼ cup for crust): Adds sweetness and helps with the cheesecake’s silky finish.
- Large eggs (2, room temperature): These bind the ingredients together and lend a tender crumb to the filling.
- Full-fat sour cream (½ cup): Gives a slight tang and richness while keeping the texture moist and delicate.
- Vanilla extract (1 teaspoon): Enhances the overall flavor profile with its warm, fragrant notes.
- Graham cracker crumbs (1 ½ cups): Forms the crunchy and flavorful base that contrasts beautifully with the creamy filling.
- Unsalted butter (6 tablespoons, melted): Binds the graham cracker crumbs and adds that golden, buttery aroma to the crust.
How to Make Creamy Classic Cheesecake: Quick, Easy & No Cracks! Recipe
Step 1: Prepare the Crust
Start by preheating your oven to 350°F (175°C). In a medium bowl, mix 1 ½ cups of graham cracker crumbs with ¼ cup granulated sugar. Pour in the melted butter and stir until the mixture has the texture of wet sand. Press this mixture firmly into the bottom of a 9-inch springform pan, making sure it’s evenly distributed. Bake the crust for 8 to 10 minutes until it’s lightly golden and fragrant. Then, set it aside to cool while you prepare the creamy filling, lowering the oven temperature to 325°F (160°C).
Step 2: Prepare the Pan for the Water Bath
Wrap the outside of your springform pan tightly with two layers of heavy-duty aluminum foil. This extra step prevents water from seeping into the crust during baking. Place the foil-wrapped pan inside a larger roasting pan, setting the stage to create a gentle, moist baking environment that’s key to avoiding cracks.
Step 3: Make the Cheesecake Batter
Using an electric mixer on low speed, beat the softened cream cheese in a large bowl until completely smooth, which takes about 2 to 3 minutes. Gradually add 1 cup of sugar, mixing until smooth but not overworked. Then stir in the sour cream and vanilla extract to add richness and depth. Finally, add the eggs one at a time, mixing very gently and only enough to combine. This careful technique ensures a silky filling that won’t crack.
Step 4: Bake the Cheesecake
Pour the batter over the cooled crust, smoothing the top. Carefully pour hot water into the roasting pan until it reaches halfway up the sides of the springform pan. This water bath is essential to keep the cheesecake creamy and crack-free. Bake for 60 to 75 minutes. You’ll know it’s done when the edges are set but the center still jiggles slightly when you gently shake the pan.
Step 5: Cool and Chill
Once baking is complete, turn off the oven and leave the cheesecake inside with the door slightly ajar for 1 hour. This slow cooling helps prevent cracking by letting the cheesecake adjust gradually to room temperature. Then remove it from the water bath, unwrap the foil, and let it cool fully on a wire rack for another 2 to 3 hours. Before serving, chill the cheesecake in the refrigerator for at least 6 hours or overnight. This final step allows it to set and develop its lush, creamy texture.
How to Serve Creamy Classic Cheesecake: Quick, Easy & No Cracks! Recipe
Garnishes
The beauty of the Creamy Classic Cheesecake: Quick, Easy & No Cracks! Recipe is how well it pairs with a variety of garnishes. Fresh berries such as strawberries, raspberries, or blueberries add a pop of color and a burst of brightness that cut through the richness. A sprinkle of toasted nuts or a drizzle of caramel or chocolate sauce will add texture and depth, making every bite an exciting experience.
Side Dishes
For a truly delightful dessert experience, serve slices alongside a dollop of lightly whipped cream or a scoop of vanilla ice cream. A small espresso or a cup of tea also complements the rich creaminess beautifully, turning your cheesecake moment into an indulgent ritual.
Creative Ways to Present
Why not get a little adventurous? Mini cheesecakes offer a fun, personal serving size perfect for parties. Or layer the cheesecake filling in clear glasses with fruit compote and crushed graham crackers for an elegant parfait twist. Even simple piping of whipped cream rosettes around the edges adds a charming, homemade touch that’s sure to impress.
Make Ahead and Storage
Storing Leftovers
Leftover cheesecake is a gift that keeps on giving. Store it tightly covered in the refrigerator for up to 5 days to preserve its creamy texture and fresh flavors. This allows you to enjoy that perfect slice whenever the craving strikes without losing any quality.
Freezing
This cheesecake freezes beautifully. Wrap it tightly in plastic wrap and then aluminum foil to prevent freezer burn. Frozen cheesecake will maintain its quality for up to 2 months. When you’re ready to enjoy it again, thaw it overnight in the refrigerator to retain its smooth and luscious consistency.
Reheating
While cheesecake is typically enjoyed cold, if you prefer it slightly warmed, you can microwave individual slices for 15-20 seconds. Just be careful not to overheat, or you may lose some of that wonderful creamy texture that makes this recipe so special.
FAQs
Why does my cheesecake crack?
Cracking usually happens due to overbaking, rapid temperature changes, or not using a water bath. This recipe avoids cracks by using a water bath and slow cooling in the oven, allowing the cheesecake to bake gently and cool gradually.
Can I use low-fat cream cheese?
For best results, full-fat cream cheese is recommended because it provides the rich, creamy texture that defines this cheesecake. Low-fat versions may result in a less smooth and less flavorful outcome.
Is it necessary to use a springform pan?
A springform pan is ideal because it allows for easy removal without damaging the delicate edges of your cheesecake. While other pans can be used, they can make releasing the cheesecake more challenging.
Can I make this cheesecake gluten-free?
Absolutely! Simply substitute the graham cracker crumbs with a gluten-free alternative or crushed gluten-free cookies for the crust, and you’ll have a gluten-free version that tastes just as fantastic.
How long can I keep the cheesecake in the fridge?
The cheesecake will keep well in the refrigerator for about 5 days when properly covered. Beyond that, you might notice some changes in texture and flavor.
Final Thoughts
Making the Creamy Classic Cheesecake: Quick, Easy & No Cracks! Recipe is truly a rewarding experience that delights the senses and fills your kitchen with wonderful aromas. It’s a timeless dessert that brings joy at every occasion, and I encourage you to try it yourself—you’ll be amazed at how simple steps lead to a stunning, crack-free cheesecake that’s as beautiful as it is delicious.
Print
Creamy Classic Cheesecake: Quick, Easy & No Cracks! Recipe
- Prep Time: 20 minutes
- Cook Time: 1 hour 15 minutes
- Total Time: 7 hours 35 minutes
- Yield: 8 servings
- Category: Dessert
- Method: Baking
- Cuisine: American
Description
This creamy classic cheesecake recipe delivers a smooth, rich dessert with a perfectly golden graham cracker crust and no cracks. Quick and easy to prepare, it features a luscious filling made with full-fat cream cheese, sour cream, and eggs, baked in a water bath for even cooking and flawless texture. Ideal for gatherings or special occasions, this cheesecake is guaranteed to impress with its velvety consistency and classic flavor.
Ingredients
Crust
- 1 ½ cups graham cracker crumbs
- ¼ cup granulated sugar
- 6 tablespoons melted unsalted butter
Filling
- 2 (8-ounce) blocks full-fat cream cheese, at room temperature
- 1 cup granulated sugar
- 2 large eggs, at room temperature
- ½ cup full-fat sour cream, at room temperature
- 1 teaspoon vanilla extract
Instructions
- Preheat the oven: Set your oven to 350°F (175°C) to prepare for baking the crust.
- Make the crust mixture: In a medium bowl, combine 1 ½ cups graham cracker crumbs with ¼ cup granulated sugar, ensuring even mixing.
- Add butter to crust: Pour in 6 tablespoons of melted unsalted butter and mix until the crumbs are evenly moistened and have a sandy texture.
- Press crust into pan: Firmly and evenly press the crumb mixture into the bottom of a 9-inch springform pan to create the crust base.
- Bake the crust: Place the crust in the oven and bake for 8-10 minutes until it turns lightly golden, then remove and cool slightly. Lower oven temperature to 325°F (160°C).
- Prepare water bath: Wrap the outside of the springform pan tightly with two layers of heavy-duty aluminum foil to prevent leaks.
- Place pan in roasting pan: Set the foil-wrapped springform pan inside a larger roasting pan.
- Beat cream cheese: Using an electric mixer on low speed, beat the two blocks of room temperature cream cheese until smooth, approximately 2-3 minutes.
- Add sugar to cream cheese: Gradually add 1 cup granulated sugar, continuing to mix on low speed until well combined and smooth, about 2 more minutes.
- Incorporate sour cream and vanilla: Stir in ½ cup sour cream and 1 teaspoon vanilla extract, mixing on low just until blended.
- Add eggs one at a time: Add the 2 large eggs individually, mixing at the lowest speed just until each egg is incorporated to avoid overmixing.
- Pour batter over crust: Evenly pour the creamy cheesecake batter over the cooled crust in the prepared springform pan.
- Add water to roasting pan: Carefully pour hot water into the larger roasting pan until it reaches about halfway up the sides of the springform pan to create a moist baking environment.
- Bake cheesecake: Place the roasting pan with the cheesecake into the oven and bake for 60-75 minutes until the edges are set but the center has a slight wobble.
- Cool in oven: Turn off the oven, prop the door open slightly, and leave the cheesecake inside for 1 hour to cool gradually and prevent cracks.
- Remove from water bath and cool: Take out the roasting pan, remove the springform from the water bath, unwrap the foil, and place on a wire rack to cool completely at room temperature for 2-3 hours.
- Refrigerate: Cover the cheesecake loosely with plastic wrap and refrigerate for at least 6 hours or overnight for best texture and flavor.
- Serve: Before serving, run a thin knife around the edges to release the cheesecake from the pan, unclasp the springform, remove the sides, and slice with a warm, clean knife for neat pieces.
Notes
- Always use room temperature ingredients for the smoothest batter and to avoid lumps.
- Using a water bath helps prevent cracks and ensures even baking.
- Wrap the springform pan tightly to prevent water from seeping into the batter during baking.
- Letting the cheesecake cool gradually in the oven reduces cracking and improves texture.
- Chilling the cheesecake overnight enhances flavor and firmness, making slicing easier.
- Warm the knife before slicing to achieve clean, smooth cuts.

