
“`html
If you’re craving a peanut butter cookie that’s bursting with gooey chocolate and just the right amount of sweetness, you’re about to fall head over heels for the Bear Paw Peanut Butter Blossom Cookies Recipe. This delightful treat combines the creamy richness of peanut butter with the nostalgic charm of chocolate disks, all topped off with adorable paw-shaped chocolate chip decorations. Whether you’re baking for a crowd or just treating yourself, these cookies strike the perfect balance between soft, chewy, and irresistibly chocolaty.
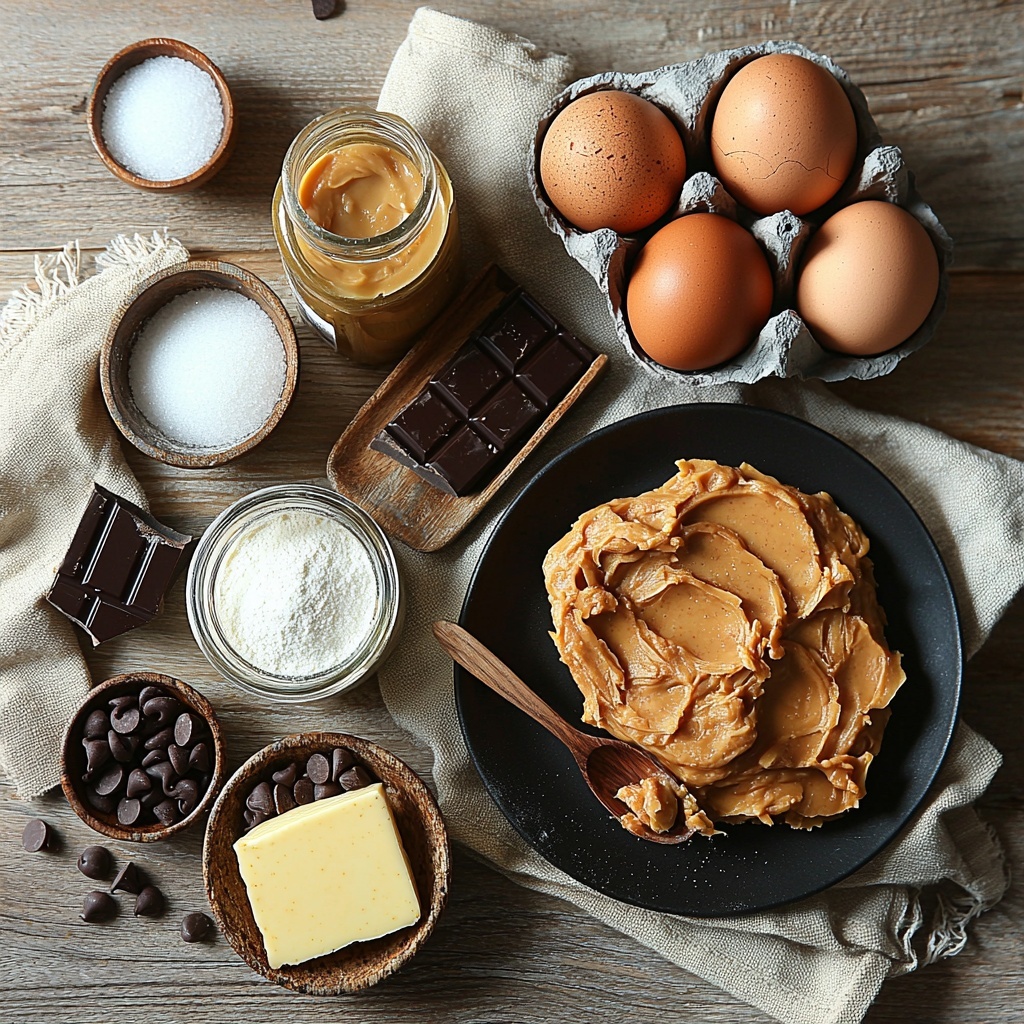
Ingredients You’ll Need
These ingredients are simple pantry staples that work together to create the perfect cookie texture and flavor. Each one is essential: from the creamy peanut butter that brings richness to the tender flour that forms the cookie’s base. Even the little touches like light brown sugar add a subtle depth of sweetness and chewiness.
- 1/2 cup butter, softened: Creates a luscious, tender crumb and helps bind everything together smoothly.
- 1 cup creamy peanut butter: The star ingredient, giving the cookies their signature rich, nutty flavor.
- 1 cup granulated sugar: Adds crisp sweetness and helps with the cookie’s delightful texture.
- 1/2 cup light brown sugar, packed: Contributes a caramel-like nuance and moist chewiness to the dough.
- 2 large eggs: Bind the ingredients and provide structure without weighing the cookies down.
- 1/2 teaspoon vanilla extract: Enhances all the flavors with a warm, comforting aroma.
- 2 cups all-purpose flour: The foundation that gives the cookies structure and bite.
- 2 teaspoons baking soda: Ensures the cookies rise just right, creating a perfect puffy texture.
- 1/2 teaspoon salt: Balances the sweetness and enhances the peanut butter’s natural flavor.
- 48 chocolate melting disks: The showstopper in the center, melting slightly to create that classic “blossom” look.
- 144 chocolate chips: Used to craft charming little paw prints that elevate the cookie’s fun factor.
How to Make Bear Paw Peanut Butter Blossom Cookies Recipe
Step 1: Preheat Oven
Your baking adventure starts with preheating your oven to 350°F (175°C). Prepare your baking sheets by lining them with parchment paper to ensure the cookies bake evenly and lift off effortlessly when done.
Step 2: Prepare Dough
In a large bowl, blend the softened butter, creamy peanut butter, granulated sugar, and light brown sugar together until you reach a smooth, creamy consistency. This mixture is where the magic begins — fluffy, rich, and ready to embrace your eggs and vanilla extract. Beat in the eggs and vanilla until everything is tightly combined, setting the stage for the perfect cookie texture.
Step 3: Combine Dry Ingredients
In another bowl, whisk together the all-purpose flour, baking soda, and salt. This dry mix is crucial for balanced flavor and texture, so take a moment to blend it well. Gradually add this dry mixture into the peanut butter batter, stirring just until combined—overmixing can make the cookies tough, so gentle is the way to go.
Step 4: Shape and Bake
Using a tablespoon or cookie scoop, drop rounded spoonfuls of dough onto your prepared baking sheets, spacing them about 2 inches apart to give room for spreading. For an optional extra touch of sparkle and crunch, roll each dough ball lightly in granulated sugar before placing them on the sheets. Bake your little dough treasures for 7 to 9 minutes, or until they’re puffy and soft, with just a hint of golden edges.
Step 5: Decorate
This is where your cookies come to life. Right after they come out of the oven, gently press a chocolate melting disk into the center of each cookie. While the chocolate disk is still soft, adorn each cookie with three chocolate chips arranged to form a cute paw print. Place the cookies on wire racks to cool completely — this lets the chocolate set perfectly and your paw prints stay charmingly intact.
How to Serve Bear Paw Peanut Butter Blossom Cookies Recipe
Garnishes
For a fun presentation, consider sprinkling a tiny pinch of sea salt on each cookie right after pressing in the chocolate disk. The subtle saltiness will heighten the peanut butter and chocolate flavors. Alternatively, a dusting of powdered sugar or even a drizzle of melted white chocolate can add flair and extra sweetness.
Side Dishes
These cookies pair wonderfully with a cold glass of milk, but if you want to elevate the experience even further, serve them alongside creamy vanilla ice cream or a dollop of whipped cream. Their rich, nutty flavors also complement warm tea blends, like chai or cinnamon-spiced black tea, for a cozy afternoon snack.
Creative Ways to Present
Bring some whimsy to your cookie platter by arranging the Bear Paw Peanut Butter Blossom Cookies as a “paw trail” across a serving plate. Stack them in a mason jar for a gift, or wrap a few tied with rustic twine for a homemade touch that friends and family will adore. These cookies aren’t just delicious; they make celebration tables extra special.
Make Ahead and Storage
Storing Leftovers
Once cooled, store your Bear Paw Peanut Butter Blossom Cookies in an airtight container at room temperature. They stay fresh and chewy for 3-4 days, allowing you to enjoy them without worrying about them going stale too quickly.
Freezing
If you want to keep these cookies longer, they freeze beautifully. Place cooled cookies in a single layer on a baking sheet to freeze briefly before transferring them to a freezer-safe bag or container. They keep well for up to 2 months, and freezing preserves their delicious freshness perfectly.
Reheating
To refresh your cookies after storage or freezing, warm them in a preheated oven at 300°F (150°C) for 5 minutes or microwave them for 10-15 seconds. This will bring back that soft, melty, just-baked feel that makes these cookies so irresistible.
FAQs
Can I use crunchy peanut butter instead of creamy?
Absolutely! Using crunchy peanut butter will add delightful texture bits to the cookies, though the dough might be slightly less smooth. Either way, the flavor will be fantastic.
What can I substitute for chocolate melting disks?
If you don’t have chocolate melting disks, large chocolate chips or small squares of your favorite chocolate bar work just as well. Just press them gently into the cookies right after baking for that signature blossom effect.
Can I make these cookies gluten-free?
You can try substituting the all-purpose flour with a gluten-free baking blend, but results may vary slightly in texture and rise. For best success, choose a blend designed for cookies.
Why do I press the chocolate disk into the cookie right after baking?
Pressing the chocolate disks into the warm cookies allows the chocolate to soften and slightly melt, creating that classic shiny blossom look and a luscious chocolate center.
How do I get the paw print chocolate chip decoration to stick properly?
Place the three chocolate chips while the cookie and chocolate disk are still warm and slightly tacky. This helps them adhere well as the cookie cools and sets.
Final Thoughts
These Bear Paw Peanut Butter Blossom Cookies Recipe are more than just a cookie—they’re a little moment of joy baked into a treat. Their mix of peanut butter richness, chocolaty goodness, and playful paw prints will make them a favorite at any gathering or simply as a personal indulgence. I can’t wait for you to try baking them yourself and savor every single bite!
“`
Print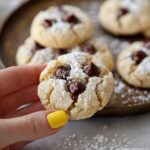
Bear Paw Peanut Butter Blossom Cookies Recipe
- Prep Time: 10 minutes
- Cook Time: 9 minutes
- Total Time: 19 minutes
- Yield: 48 cookies
- Category: Dessert
- Method: Baking
- Cuisine: American
Description
These Bear Paw Peanut Butter Blossom Cookies are soft, chewy treats combining creamy peanut butter dough with a gooey chocolate center and a charming paw print made from chocolate chips. Perfect for festive occasions, kids, or anyone who loves a classic peanut butter cookie with a fun twist.
Ingredients
Wet Ingredients
- 1/2 cup butter, softened
- 1 cup creamy peanut butter
- 1 cup granulated sugar
- 1/2 cup light brown sugar, packed
- 2 large eggs
- 1/2 teaspoon vanilla extract
Dry Ingredients
- 2 cups all-purpose flour
- 2 teaspoons baking soda
- 1/2 teaspoon salt
Decoration
- 48 chocolate melting disks
- 144 chocolate chips
Instructions
- Preheat Oven: Preheat your oven to 350°F (175°C). Line baking sheets with parchment paper to prevent sticking and ensure even baking.
- Prepare Dough: In a large bowl, beat together the softened butter, creamy peanut butter, granulated sugar, and light brown sugar until the mixture is smooth and creamy. Then mix in the eggs and vanilla extract until the batter is well combined and uniform.
- Combine Dry Ingredients: In a separate bowl, whisk together the all-purpose flour, baking soda, and salt. Gradually add this dry mixture to the peanut butter mixture, stirring until just combined to avoid overmixing and ensure soft cookies.
- Shape and Bake: Using rounded tablespoons, scoop the dough onto the prepared baking sheets, spacing each about 2 inches apart to allow for spreading. Optionally, roll the dough balls in extra sugar before placing them on the sheet for an added sweet crunch. Bake the cookies for 7-9 minutes or until they appear puffy and soft.
- Decorate: Immediately after removing the cookies from the oven, press one chocolate melting disk into the center of each cookie. Then add three chocolate chips around the disk to create a cute paw print design. Allow the cookies to cool on wire racks so the chocolate melts lightly and sets while keeping the cookie soft.
Notes
- For best results, do not overbake; the cookies should remain soft and puffy.
- Use parchment paper or silicone baking mats to prevent sticking and make cleanup easier.
- Adjust spacing on the baking sheet if you prefer thicker or thinner cookies.
- Chocolate melting disks can be substituted with chocolate candies if preferred.
- Store cookies in an airtight container at room temperature for up to 5 days.

