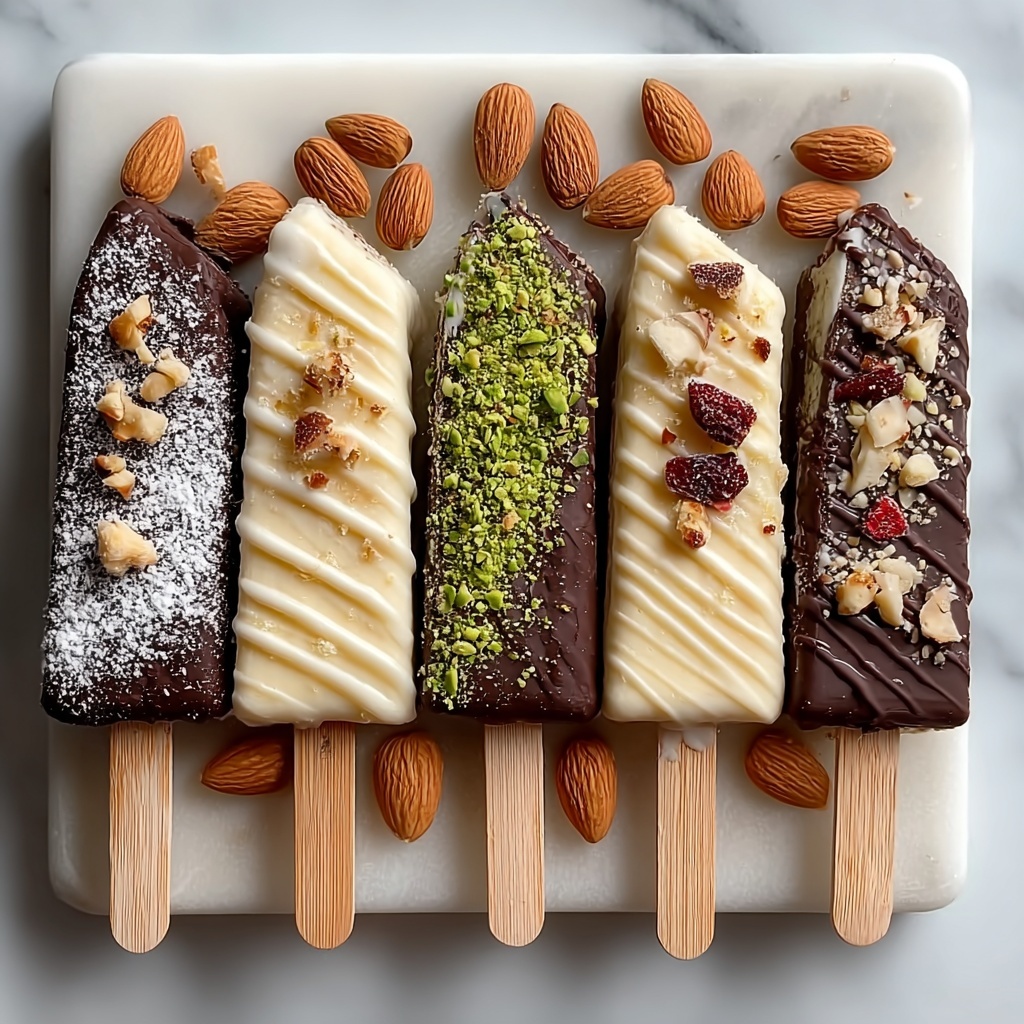
If you’re craving a delightful bite-sized dessert that is both playful and packed with creamy goodness, look no further than Cheesecake Pops: A Fun and Delicious Treat Recipe. These adorable little cheesecake balls on sticks are perfectly smooth inside and dipped in rich chocolate, creating a heavenly balance of flavors and textures. Whether you’re making them for a party, a special occasion, or just a sweet craving, this recipe brings joy in every bite and is surprisingly simple to make at home.
Ingredients You’ll Need
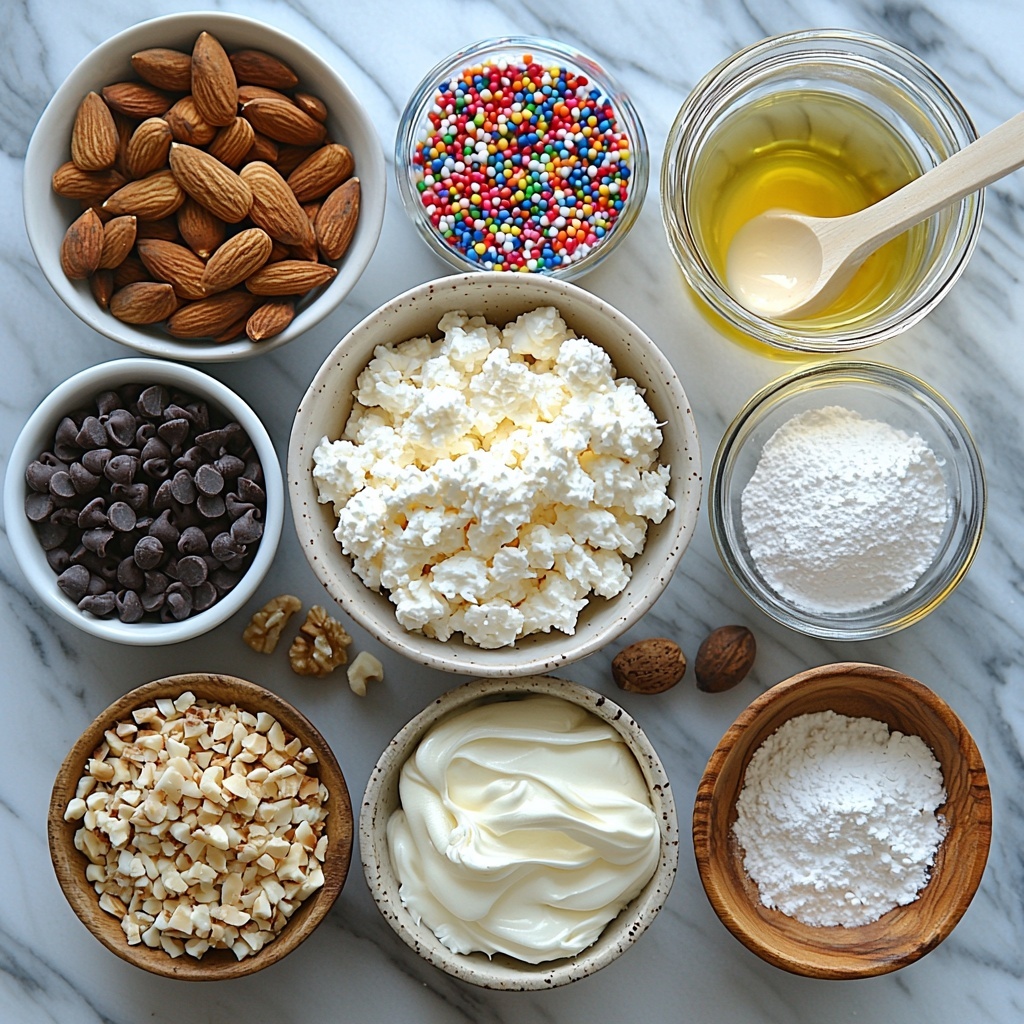
Getting started with these cheesecake pops is a breeze because the ingredients are simple yet essential. Each one plays a crucial role, from delivering that signature creamy texture to adding a luscious coating or a burst of flavor through toppings.
- 8 oz cream cheese: Softened to ensure the mixture is silky smooth and creamy.
- 1/2 cup powdered sugar: Adds the perfect amount of sweetness without any grittiness.
- 1 teaspoon vanilla extract: Infuses the base with a warm, aromatic flavor.
- 1/2 cup sour cream: Enhances creaminess and adds a slight tang for depth.
- 1/4 cup heavy cream: Gives the mixture a light and fluffy texture that melts in your mouth.
- 1 cup chocolate chips: You can choose milk, dark, or white chocolate depending on your preference for the coating.
- 1 tablespoon coconut oil: Helps the chocolate melt smoothly and gives it a nice shine.
- Crushed graham crackers: For that nostalgic cheesecake crust flavor, optional but highly recommended.
- Sprinkles: Bright and colorful, perfect for adding a festive touch.
- Chopped nuts: Almonds or walnuts add a delightful crunch and nutty contrast.
- Drizzle of caramel or chocolate sauce: Elevates the pops with extra sweetness and decorative flair.
- Lollipop sticks: Essential for serving and easy handling of these fun treats.
How to Make Cheesecake Pops: A Fun and Delicious Treat Recipe
Step 1: Beat the Cream Cheese
Start with softened cream cheese in a mixing bowl and beat it until it’s smooth and creamy. This forms the luscious base that defines the texture of your cheesecake pops.
Step 2: Add Sugar and Flavorings
Next, gradually add powdered sugar, vanilla extract, and sour cream. Mixing these well ensures the cheesecake mixture is sweet, flavorful, and perfectly tangy.
Step 3: Incorporate Heavy Cream
Add the heavy cream to the bowl and mix until your mixture turns light and fluffy. This step elevates the texture, making the pops delightfully airy and melt-in-your-mouth good.
Step 4: Scoop and Shape
Using a cookie scoop or your clean hands, scoop portions of the cheesecake mixture and roll them into approximately 1-inch diameter balls. This size is just right for a perfect bite.
Step 5: Insert Sticks
Carefully place a lollipop stick halfway into each cheesecake ball. This turns them into the iconic pops, making them easy to dip and fun to eat.
Step 6: Chill
Arrange the pops on a parchment-lined baking sheet and refrigerate for 3 to 4 hours until firm. Chilling is key to making sure they hold their shape when dipped in chocolate.
Step 7: Melt Chocolate
Combine chocolate chips and coconut oil in a microwave-safe bowl and melt them in 30-second bursts, stirring each time until you have a smooth, glossy chocolate coating.
Step 8: Cool Slightly
Let the melted chocolate cool for a few minutes so it’s not too hot when dipping the cheesecake pops—this helps prevent melting or cracking.
Step 9: Dip Cheesecake Pops
Remove the chilled cheesecake pops from the fridge and dunk each one into the melted chocolate, ensuring they are fully coated. This rich shell encases the creamy center beautifully.
Step 10: Add Toppings
Before the chocolate sets, sprinkle crushed graham crackers, colorful sprinkles, or chopped nuts on top for extra texture and a pop of personality.
Step 11: Place on Baking Sheet
Return the chocolate-coated cheesecake pops to the parchment paper-lined baking sheet to keep their shape and avoid any mess.
Step 12: Set the Chocolate
Pop the sheet back in the fridge for about 30 minutes so the chocolate can harden to a shiny, crisp finish that’s just waiting to be enjoyed.
Step 13: Enjoy
Once set, your Cheesecake Pops: A Fun and Delicious Treat Recipe is ready to dazzle the taste buds! Serve them at room temperature or slightly chilled for maximum delight.
How to Serve Cheesecake Pops: A Fun and Delicious Treat Recipe
Garnishes
Garnishes can take your cheesecake pops to the next level. Feel free to sprinkle crushed graham crackers or colorful sprinkles to add eye-catching contrast and delightful flavor notes. A light drizzle of caramel or chocolate sauce over the set coating also adds elegance and extra sweetness without overpowering the creamy filling.
Side Dishes
These cheesecake pops are fantastic on their own, but pairing them with fresh berries or a dollop of whipped cream complements their richness beautifully. A chilled glass of sparkling lemonade or coffee can also balance the sweetness, making your dessert experience even more memorable.
Creative Ways to Present
Presentation is everything when it comes to these cute treats. Arrange them upright in a decorative foam block covered with doilies or festive tissue paper. You can also tie small ribbons on each stick for a personalized touch, perfect for parties, gifts, or celebrations.
Make Ahead and Storage
Storing Leftovers
Leftover cheesecake pops keep well in an airtight container in the fridge for up to 3 days. Make sure each pop is cooled and coated properly before storing to preserve their texture and flavor.
Freezing
You can freeze these cheesecake pops for up to a month. Place them on a parchment-lined tray first to freeze individually before transferring them to a sealed freezer bag. This prevents them from sticking together and maintains their shapes beautifully.
Reheating
Since these are best enjoyed cold or at room temperature, skip reheating. Just leave frozen pops in the refrigerator overnight to thaw gently before serving, ensuring the chocolate coating stays intact and the creamy interior remains perfect.
FAQs
Can I use flavored cream cheese for these cheesecake pops?
Absolutely! Using flavored cream cheese like strawberry or honey can add a new twist. Just ensure it’s softened and adjust the sugar accordingly to balance the sweetness.
What type of chocolate works best for the coating?
Milk, dark, or white chocolate all work wonderfully. If you prefer something not too sweet, go for dark chocolate. Adding coconut oil helps any choice melt smoothly and coating evenly.
How long do cheesecake pops last at room temperature?
It’s best to keep cheesecake pops refrigerated until serving. At room temperature, they can last for about 1-2 hours, but to maintain freshness and safety, keep them chilled whenever possible.
Can I make these gluten-free?
Yes! Simply skip the graham cracker topping or use gluten-free graham crackers. The cheesecake pops themselves contain no gluten as long as all toppings are gluten-free.
What’s the best way to prevent the chocolate from melting on warm days?
Keep your cheesecake pops refrigerated until just before serving. If it’s hot outside, store them in a cooler or insulated container to protect the chocolate coating from melting.
Final Thoughts
There’s something truly joyful about making and sharing Cheesecake Pops: A Fun and Delicious Treat Recipe. They bring all the charm of cheesecake in a bite-sized, portable form that’s perfect for any occasion. So grab your ingredients, roll up your sleeves, and get ready to enjoy a dessert that’s as fun to make as it is to eat. Trust me, once you try these, you’ll be hooked!
Print
Cheesecake Pops: A Fun and Delicious Treat Recipe
- Prep Time: 30 minutes
- Cook Time: 0 minutes
- Total Time: 3 hours 30 minutes
- Yield: Approximately 20 cheesecake pops
- Category: Dessert
- Method: No-Cook
- Cuisine: American
- Diet: Vegetarian
Description
Cheesecake Pops are a fun and delicious treat featuring creamy cheesecake balls coated in smooth melted chocolate and topped with a variety of delightful toppings. Perfect for parties, celebrations, or a sweet snack, these no-bake pops combine the classic flavors of cheesecake with the convenience of bite-sized servings on a stick.
Ingredients
For the Cheesecake Mixture:
- 8 oz cream cheese, softened
- 1/2 cup powdered sugar
- 1 teaspoon vanilla extract
- 1/2 cup sour cream
- 1/4 cup heavy cream
For Coating:
- 1 cup chocolate chips (milk, dark, or white chocolate)
- 1 tablespoon coconut oil
For Toppings (Optional):
- Crushed graham crackers
- Sprinkles
- Chopped nuts such as almonds or walnuts
- Drizzle of caramel or chocolate sauce
For Assembly:
- Lollipop sticks
Instructions
- Beat the Cream Cheese: In a mixing bowl, beat 8 oz of softened cream cheese until smooth and creamy.
- Add Sugar and Flavorings: Gradually add 1/2 cup of powdered sugar, 1 teaspoon of vanilla extract, and 1/2 cup of sour cream. Mix until well combined.
- Incorporate Heavy Cream: Add 1/4 cup of heavy cream and mix until the mixture is smooth and fluffy.
- Scoop and Shape: Using a cookie scoop or your hands, scoop out portions of the cheesecake mixture and roll them into balls approximately 1 inch in diameter.
- Insert Sticks: Place a lollipop stick into each cheesecake ball, inserting about halfway through to secure properly.
- Chill: Arrange the cheesecake pops on a parchment paper-lined baking sheet and refrigerate for 3-4 hours or until firm.
- Melt Chocolate: In a microwave-safe bowl, combine 1 cup of chocolate chips with 1 tablespoon of coconut oil. Microwave in 30-second intervals, stirring between sessions, until melted and smooth.
- Cool Slightly: Allow the melted chocolate to cool for a few minutes to prevent melting the cheesecake balls when dipping.
- Dip Cheesecake Pops: Remove the cheesecake pops from the refrigerator and fully coat each pop by dipping it into the melted chocolate.
- Add Toppings: Before the chocolate sets, sprinkle desired toppings such as crushed graham crackers, sprinkles, or chopped nuts onto the coated pops.
- Place on Baking Sheet: Return the decorated pops to the parchment-lined baking sheet.
- Set the Chocolate: Refrigerate the coated cheesecake pops for about 30 minutes to allow the chocolate to harden completely.
- Enjoy: Once the chocolate is set, serve your cheesecake pops chilled or at room temperature and enjoy this delightful and convenient dessert.
Notes
- Ensure the cream cheese is fully softened for smooth mixing.
- You can customize toppings based on preference, including using different types of nuts or sauces.
- For easier dipping, allow the chocolate to cool slightly but not harden.
- Store leftover cheesecake pops in the refrigerator in an airtight container for up to 4 days.
- Use parchment paper on your baking sheet to prevent sticking and ease cleanup.


