
If you’ve ever thought gluten-free bread had to be complicated or lack that comforting, classic feel, I have fantastic news for you. This Classic Gluten-Free White Sandwich Bread Recipe is a true gem—simple enough for any home baker, yet packed with flavor and the perfect texture that holds up beautifully for sandwiches, toast, or just slathered with butter straight from the loaf. The fluffy crumb and golden crust come together effortlessly, making it an indispensable staple in your gluten-free baking repertoire.

Ingredients You’ll Need
Every ingredient in this recipe plays a crucial role, coming together harmoniously to create the perfect balance of softness, flavor, and structure. It might look straightforward, but each component contributes to the bread’s irresistible appeal.
- 2 cups gluten-free all-purpose flour: The foundation for this bread, ensuring it’s tender yet sturdy enough to slice.
- 1 tablespoon sugar: Helps activate the yeast and adds a touch of subtle sweetness.
- 1 teaspoon salt: Enhances flavor and balances the sweetness for a well-rounded taste.
- 1 tablespoon active dry yeast: The magic that makes the bread rise and that airy texture we crave.
- 1 cup warm water: Activates the yeast and hydrates the flour to create the perfect dough consistency.
- 2 tablespoons olive oil: Adds moisture and a hint of richness for a softer crumb.
- 2 eggs: Bind everything together and contribute to a tender, fluffy interior.
How to Make Classic Gluten-Free White Sandwich Bread Recipe
Step 1: Prepare Your Pan and Oven
Start by preheating your oven to 375°F (190°C) and generously greasing a loaf pan. Getting your oven perfectly heated and your pan ready ensures your bread bakes evenly and doesn’t stick, giving you that flawless crust.
Step 2: Mix the Dry Ingredients
Combine the gluten-free all-purpose flour, sugar, salt, and active dry yeast in a large bowl. Mixing the dry ingredients thoroughly helps distribute the yeast and salt evenly, so your bread rises beautifully and tastes just right.
Step 3: Add the Wet Ingredients
Pour in the warm water, olive oil, and eggs to your dry mix. Stir this all together until you get a smooth, uniform dough. The warmth of the water activates the yeast, while the eggs and olive oil add richness and moisture. This stage is where your dough starts to come alive, so enthusiasm is key!
Step 4: Transfer and Shape
Pour your dough into the greased loaf pan and smooth out the top with a spatula. This step sets the stage for that classic sandwich bread shape and ensures even baking throughout the loaf.
Step 5: Bake to Perfection
Place the pan in your preheated oven and bake for approximately 40 minutes. You’re aiming for a golden-brown exterior that sounds hollow when tapped—a sure sign your bread is perfectly baked and wonderfully airy inside.
Step 6: Cool Before Enjoying
Let your bread cool in the pan for 10 minutes—this rest helps it firm up slightly and prevents it from tearing when you remove it. Then, transfer to a wire rack to cool completely. Patience at this stage means cleaner slices and a better texture when you dig in.
How to Serve Classic Gluten-Free White Sandwich Bread Recipe
Garnishes
While this bread shines on its own, topping slices with a spread of creamy butter, a drizzle of honey, or a sprinkle of fresh herbs like rosemary can take your enjoyment to the next level. Simple garnishes enhance the bread’s subtle flavors beautifully.
Side Dishes
Pairing your Classic Gluten-Free White Sandwich Bread Recipe with hearty soups like tomato bisque or chicken noodle makes a cozy, comforting meal. It also works wonders alongside vibrant salads or even as a base for open-faced sandwiches packed with fresh veggies and deli meats.
Creative Ways to Present
Turn your bread into thumbprint sandwiches by cutting small rounds and filling them with your favorite spreads or sliced fruits. Toast slices lightly and top them with avocado smash and a pinch of chili flakes for a trendy snack. The possibilities with this versatile loaf are truly endless.
Make Ahead and Storage
Storing Leftovers
Keep any leftover bread in an airtight container or wrapped tightly in plastic wrap at room temperature for up to 3 days. This prevents it from drying out and keeps the crust tender, so each slice feels freshly baked.
Freezing
This bread freezes beautifully. Slice it before freezing, so you can pull out individual pieces as needed. Wrap slices in plastic or foil, then place them in a freezer bag for up to 3 months. It’s a total game-changer for busy days.
Reheating
To bring frozen or leftover bread back to life, toast the slices directly or warm whole loaves in the oven at 350°F (175°C) for about 10 minutes. This restores the texture and aroma, making it taste as vibrant as when it first came out of the oven.
FAQs
Can I use a gluten-free flour blend other than all-purpose?
Absolutely! While this recipe is designed with gluten-free all-purpose flour in mind, other blends with similar starch and protein content can work. Just make sure your blend includes xanthan gum or another binder for the best texture.
Why do I need to let the bread cool completely before slicing?
Cooling allows the bread to set and the crumb to firm up, which means your slices won’t crumble or squish. It also enhances the flavor as the moisture redistributes evenly throughout the loaf.
Can I substitute olive oil with another type of oil?
Yes! Light vegetable oil, avocado oil, or even melted coconut oil are great alternatives. Just keep the amount the same to maintain the bread’s moisture and texture.
Is it possible to make this recipe vegan?
It’s a bit tricky since eggs provide structure and moisture, but you can try replacing the eggs with flax or chia egg substitutes. The texture might vary slightly, but it’s worth experimenting if you follow a vegan diet.
How can I make this bread gluten-free and dairy-free?
This Classic Gluten-Free White Sandwich Bread Recipe is naturally dairy-free, so no changes needed on that front. Just ensure your gluten-free flour blend and other ingredients are certified dairy-free for peace of mind.
Final Thoughts
I genuinely hope you give this Classic Gluten-Free White Sandwich Bread Recipe a try because nothing beats the joy of baking a fresh, homemade loaf that’s free from gluten yet full of heart. It’s straightforward, comforting, and endlessly versatile—just like a true classic should be. Happy baking, my friend!
Print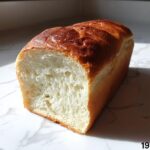
Classic Gluten-Free White Sandwich Bread Recipe
- Prep Time: 10 minutes
- Cook Time: 40 minutes
- Total Time: 55 minutes
- Yield: 1 loaf (about 8 slices)
- Category: Bread
- Method: Baking
- Cuisine: American
- Diet: Gluten Free
Description
This Classic White Sandwich Bread recipe creates a soft, fluffy gluten-free loaf perfect for sandwiches and toast. Made with simple ingredients like gluten-free flour, eggs, and olive oil, this easy-to-follow baking recipe yields a golden crust and tender crumb, suitable for those avoiding gluten without compromising on taste or texture.
Ingredients
Dry Ingredients
- 2 cups gluten-free all-purpose flour
- 1 tablespoon sugar
- 1 teaspoon salt
- 1 tablespoon active dry yeast
Wet Ingredients
- 1 cup warm water
- 2 tablespoons olive oil
- 2 eggs
Instructions
- Preheat and prepare pan: Preheat the oven to 375°F (190°C) and grease a loaf pan thoroughly to prevent sticking.
- Mix dry ingredients: In a large mixing bowl, combine the gluten-free all-purpose flour, sugar, salt, and active dry yeast, ensuring these are well distributed.
- Add wet ingredients: Pour in the warm water, olive oil, and eggs. Mix thoroughly until a smooth and homogenous dough forms without lumps.
- Transfer to loaf pan: Spoon the dough into the greased loaf pan, then even out the surface with a spatula for uniform baking.
- Bake the bread: Place the loaf pan in the oven and bake for 40 minutes or until the bread develops a golden-brown crust and sounds hollow when tapped on the bottom, indicating it is fully baked.
- Cool the bread: Remove the bread from the oven and let it cool in the pan for 10 minutes. Afterward, transfer it to a wire rack to cool completely before slicing to preserve texture and flavor.
Notes
- Ensure the water is warm (not hot) to activate yeast properly without killing it.
- You can substitute olive oil with any neutral-flavored oil if preferred.
- Allow the bread to cool completely before slicing to avoid a gummy texture.
- For a softer crust, cover the loaf loosely with a clean towel while cooling.
- Store bread in an airtight container or bread box to maintain freshness for up to 3 days.


