
If you have a soft spot for the perfect blend of rich chocolate and creamy peanut butter, you’re going to love this Homemade Chocolate Peanut Butter Cups Recipe. It’s a delightful treat that combines the smooth silkiness of melted chocolate with a luscious, sweetened peanut butter center, all wrapped up in a bite-sized cup of pure joy. Whether you need a homemade gift or just a special snack to satisfy those sweet cravings, this recipe brings together simple ingredients and easy steps to create a delectable classic that everyone will adore.
Ingredients You’ll Need
The beauty of this Homemade Chocolate Peanut Butter Cups Recipe lies in its simplicity. Each ingredient plays a crucial part, adding distinct flavor, smooth texture, or that irresistible chocolate shine.
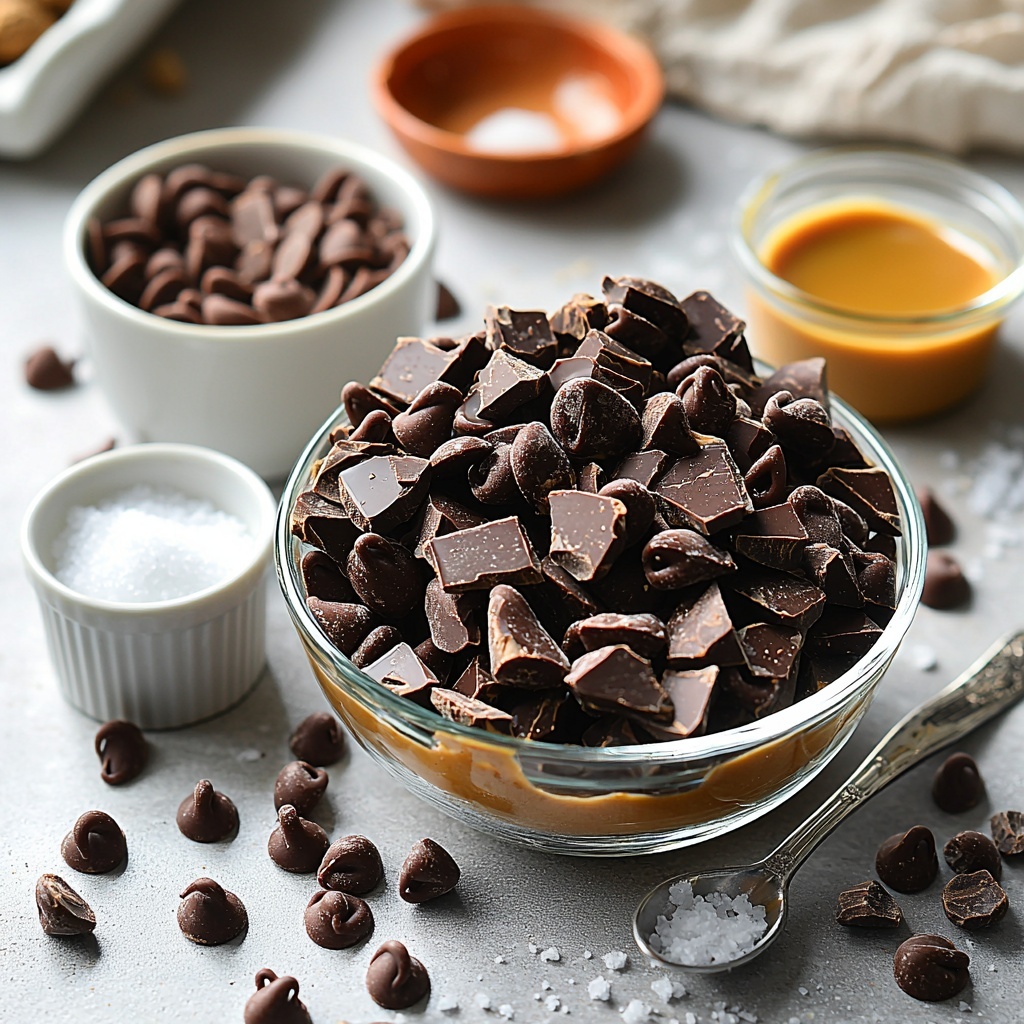
- 16 ounces chocolate chips: Using divided amounts helps create both the cup base and top, giving a rich chocolate coating that perfectly balances the filling.
- 3 teaspoons coconut oil (optional): Adds gloss and smoothness to the melted chocolate, making it set beautifully without losing shine.
- ½ cup creamy peanut butter: Shelf-stable peanut butter provides the creamy, nutty center that is irresistible in texture and flavor.
- ¼ cup powdered sugar: Sweetens and firms up the peanut butter filling for the ideal consistency.
- ½ teaspoon vanilla extract: Enhances the flavor depth of the peanut butter with a warm, fragrant note.
- ¼ teaspoon table salt: Balances sweetness and boosts the overall flavor, making every bite perfectly satisfying.
How to Make Homemade Chocolate Peanut Butter Cups Recipe
Step 1: Prepare Your Pan
Start by lining a muffin tin with silicone or paper liners. Use either a 6-cup tin for larger cups or a 12-cup mini version if you prefer bite-sized treats. This step ensures your cups won’t stick and come out perfectly formed.
Step 2: Melt and Form the Chocolate Base
Take 1 cup of chocolate chips and slowly melt them in the microwave using 30-second bursts, stirring often so you don’t scorch the chocolate. Blend in one teaspoon of coconut oil to get that glossy finish. Then spoon roughly half a tablespoon of this melted chocolate into each muffin cup and spread it evenly. Pop the tray into the fridge or freezer for about 5 minutes to let the chocolate harden and form a solid base.
Step 3: Mix the Peanut Butter Filling
While the chocolate sets, whisk together creamy peanut butter, powdered sugar, vanilla extract, and salt using a handheld mixer until smooth. The mixture should be thick enough to hold its shape, like a soft cookie dough. If you’re using natural peanut butter, feel free to add a little extra powdered sugar to thicken it up just right.
Step 4: Shape the Peanut Butter Discs
Remove the bases from the fridge and scoop about one tablespoon of peanut butter mixture per cup. Shape each into a disc just a hair smaller than the chocolate base and gently press it on top. This keeps the perfect balance of chocolate to peanut butter in every bite.
Step 5: Melt Remaining Chocolate and Seal the Cups
Now for the magic top layer! Melt the remaining 1½ cups of chocolate chips, again mixing in the last two teaspoons of coconut oil for shine and smoothness. Cover the peanut butter discs with about two teaspoons of the chocolate, spreading it evenly and letting it drip slightly down the sides to fully encase that luscious filling.
Step 6: Chill to Harden
Put your tray back in the fridge for about an hour or use the freezer for 10 to 15 minutes if you’re in a hurry. This step firms everything up nicely so that your homemade cups hold their shape perfectly when you take them out.
Step 7: Remove and Enjoy
Once hardened, pop your peanut butter cups out of the liners and store them in an airtight container. Let them sit a few minutes at room temperature before savoring to enjoy that melt-in-your-mouth texture and flavor.
How to Serve Homemade Chocolate Peanut Butter Cups Recipe
Garnishes
A dusting of cocoa powder or a few flakes of sea salt sprinkled on top just before the chocolate sets can add a lovely contrast in flavor and an elegant touch to your homemade chocolate peanut butter cups. You can also add finely chopped peanuts for a bit of crunch and visual appeal.
Side Dishes
These peanut butter cups make an excellent pairing with a cold glass of milk or even a rich coffee or espresso. For brunch or dessert tables, serve alongside fresh berries or light vanilla ice cream to balance out the richness.
Creative Ways to Present
Package your Homemade Chocolate Peanut Butter Cups Recipe treats in decorative boxes or small jars to gift friends and family. You can also alternate dark, milk, and white chocolate layers for a stunning striped look that will wow everyone. Wrapping them individually in colorful parchment or foil adds a personal touch that makes these goodies extra special.
Make Ahead and Storage
Storing Leftovers
Keep your peanut butter cups fresh by storing them in an airtight container in the fridge. They will stay delicious for up to five days, making them a perfect make-ahead treat for busy weeks or special occasions.
Freezing
If you want to keep your homemade chocolate peanut butter cups for longer, freezing is a great option. Simply arrange them in a single layer on a baking sheet to freeze individually, then transfer to a freezer-safe container or bag for up to three months. Thaw by placing them in the fridge overnight before enjoying.
Reheating
Since these treats are best enjoyed slightly soft, avoid microwaving. Instead, just let them warm gently at room temperature for 5 to 10 minutes. This helps the chocolate soften and the peanut butter center become delectably creamy without risk of melting or becoming oily.
FAQs
Can I use natural peanut butter for this recipe?
Absolutely! Just be prepared to add a bit more powdered sugar to thicken the filling, since natural peanut butter tends to be runnier. Adjust until the mixture holds its shape like a soft dough.
Is coconut oil necessary in the chocolate?
Coconut oil is optional but highly recommended as it helps the chocolate melt smoothly and sets with a beautiful glossy finish. Without it, the chocolate might be a little less shiny and can set harder.
Can I make these peanut butter cups vegan?
Yes! Use dairy-free chocolate chips and ensure the peanut butter and sugar you choose fit your vegan standards. Many versions of coconut oil and shelf-stable peanut butter are also vegan-friendly.
How long do these cups keep at room temperature?
Because of the peanut butter filling, it’s best to store them in the fridge, especially in warm climates. If left at room temperature, enjoy them within a few hours to avoid spoilage and maintain freshness.
Can I substitute almond butter or other nut butters?
Certainly! Almond butter or other nut butters can be delicious substitutes. Keep in mind the texture and sweetness might vary, so you may need to tweak powdered sugar amounts to get the right consistency.
Final Thoughts
This Homemade Chocolate Peanut Butter Cups Recipe is truly one of those special treats that bring so much joy with its perfect marriage of flavors and textures. Whether you’re making them for yourself or to share with loved ones, it’s a recipe that promises satisfaction at every bite. So go ahead, dive into this sweet and nutty delight—you might just find your new favorite homemade indulgence!
Print
Homemade Chocolate Peanut Butter Cups Recipe
- Prep Time: 15 minutes
- Cook Time: 10 minutes
- Total Time: 1 hour 10 minutes
- Yield: 12 servings
- Category: Dessert
- Method: No-Cook
- Cuisine: American
Description
This Homemade Chocolate Peanut Butter Cups recipe creates delectably rich and creamy treats with layers of smooth peanut butter filling encased in glossy, melted chocolate. Perfect for satisfying your sweet tooth, these cups are easy to make with simple ingredients, and can be customized to suit your taste preferences. Enjoy them as a delightful dessert or a special snack.
Ingredients
Chocolate Layers
- 16 ounces chocolate chips (divided; approximately 2½ cups of chocolate chips or chopped chocolate)
- 3 teaspoons coconut oil (divided, optional)
Peanut Butter Filling
- ½ cup creamy peanut butter (shelf-stable is best)
- ¼ cup powdered sugar
- ½ teaspoon vanilla extract
- ¼ teaspoon table salt
Instructions
- Prepare Pan: Line a 6-cup muffin tin with silicone or paper liners, or use 12-cup mini cupcake liners for smaller portions.
- Assemble Chocolate Base: Place 1 cup of chocolate chips in a small heat-safe bowl. Microwave in 30-second bursts, stirring between each, until mostly melted with some chunks remaining. Stir continuously to melt fully using residual heat. Stir in 1 teaspoon of coconut oil until the mixture is glossy and smooth.
- Form Chocolate Base: Spoon about ½ tablespoon of melted chocolate into each muffin cup, spreading it evenly into a thin layer with the back of a spoon. Chill in the fridge or freezer for 5 minutes to harden the base.
- Prepare Peanut Butter Filling: In a medium bowl, beat ½ cup creamy peanut butter, ¼ cup powdered sugar, ½ teaspoon vanilla extract, and ¼ teaspoon salt with a handheld mixer on medium speed until smooth and well combined. For natural peanut butter, add 1-2 tablespoons more powdered sugar to thicken. The mixture should be firm enough to shape like soft cookie dough.
- Shape Peanut Butter Discs: Remove muffin tin from fridge. Shape about 1 tablespoon of peanut butter mixture per cup into small discs slightly smaller than the chocolate base. Place each disc into the muffin cups atop the hardened chocolate layer.
- Melt Remaining Chocolate: In a clean small heat-safe bowl, microwave remaining 1½ cups of chocolate chips in 30-second intervals, stirring between, until mostly melted with few chunks left. Stir fully with residual heat, then add remaining 2 teaspoons coconut oil and mix until smooth and glossy.
- Cover Peanut Butter: Pour about 2 teaspoons of melted chocolate over each peanut butter disc, smoothing with the back of a spoon and allowing excess to drip down the sides to fully encase the peanut butter filling.
- Harden Peanut Butter Cups: Return the tray to the refrigerator to harden for about an hour, or speed up setting by placing in the freezer for 10-15 minutes.
- Store and Serve: Once hardened, remove the peanut butter cups from the muffin tin and liners if desired. Store in an airtight container in the refrigerator for up to 5 days. Let sit at room temperature for 5-10 minutes before serving to enhance flavor and texture.
Notes
- For natural peanut butter, increase powdered sugar by 1-2 tablespoons to achieve the right consistency.
- Use silicone liners to easily remove the peanut butter cups without breaking.
- Add a pinch of sea salt on top for a salted chocolate peanut butter variation.
- Store in the fridge to maintain shape, especially in warm climates.
- Allow cups to sit at room temperature briefly before eating for a better melt-in-the-mouth experience.

