“`html
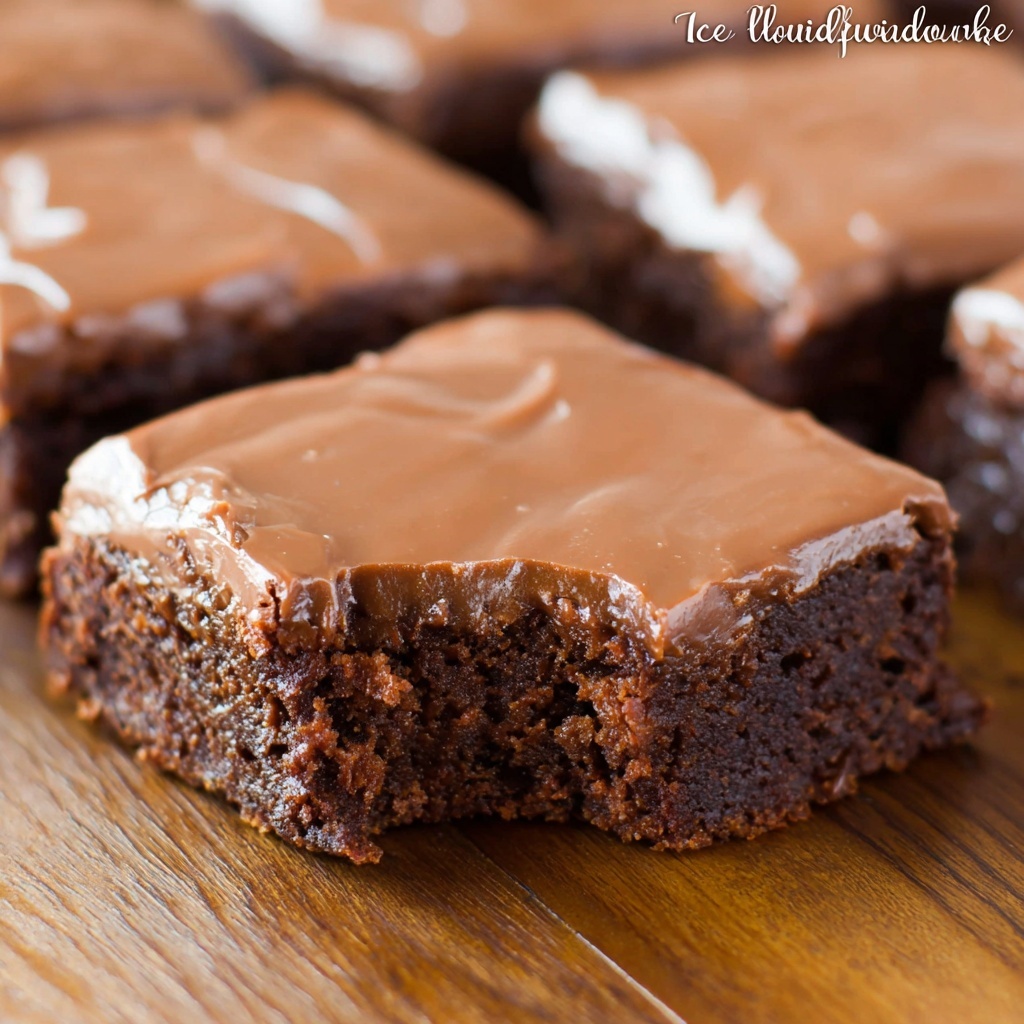
If you’ve ever dreamt of a fudgy, chocolaty treat that feels just like cozy nostalgia wrapped into a single bite, then you’re going to fall head over heels for the Lunch Lady Brownies Recipe. These brownies deliver that perfect balance of rich cocoa goodness with a creamy frosting that makes every mouthful simply unforgettable. Trust me, once you taste these, they’ll become a go-to recipe that you’ll want to make again and again for family, friends, or just a sweet pick-me-up.

Ingredients You’ll Need
Gathering simple, everyday ingredients is all it takes to whip up these incredible brownies. Each item plays a key role — from the velvety cocoa powder creating deep chocolate notes, to the eggs bringing structure and softness, and that dreamy frosting tying everything together with silky sweetness.
- 1 cup salted butter (melted): Provides richness and a tender crumb to your brownies.
- 1/2 cup unsweetened cocoa powder: Delivers intense chocolate flavor without added sweetness.
- 2 cups all-purpose flour: Adds the necessary body to hold your fudgy brownies together.
- 2 cups granulated sugar: Sweetens while helping with texture and moisture retention.
- 4 large eggs: Bind the ingredients and give the brownies a lovely, moist softness.
- 4 teaspoons vanilla extract: Enhances the chocolate flavor with warm, aromatic notes.
- 1/4 cup salted butter (softened): Key ingredient for the luscious frosting’s creamy base.
- 1/4 cup 2% milk: Adds just the right moisture to create smooth frosting.
- 1/4 cup unsweetened cocoa powder: Intensifies the chocolate flavor in the frosting for perfect balance.
- 3 cups powdered sugar: Sweetens and thickens the frosting for that classic brownie finish.
How to Make Lunch Lady Brownies Recipe
Step 1: Prep Your Oven and Pan
Start by heating your oven to 350° F. Then line a 9×13-inch baking dish with parchment paper and give the paper a quick spray with non-stick spray. This step ensures your brownies lift out perfectly without any sticking—such a small detail that makes cleanup a breeze!
Step 2: Mix the Brownie Batter
In the bowl of your electric stand mixer, pour in the melted butter and the first half cup of cocoa powder. Using the paddle attachment, blend them until the mixture becomes smooth and glossy. Next, add the flour and granulated sugar, mixing well until combined. Beat in the eggs and vanilla extract, but be sure to stop mixing as soon as everything is just combined—overmixing can make brownies tough, so keep the batter thick and fudgy!
Step 3: Bake to Perfection
Pour the rich batter into your prepared pan, then spread it evenly with a spatula. Pop it into the oven and bake for 25 to 30 minutes, or until a toothpick inserted into the center comes out clean. Remember to let the brownies cool in the pan for 15 minutes; it’s important they’re still warm when you spread on the frosting—that way it melts just slightly, creating that perfect layer.
Step 4: Whip Up the Chocolate Frosting
While the brownies are warming up, it’s time to make the frosting. Beat together the softened butter, 2% milk, cocoa powder, and powdered sugar until silky smooth. Pour this decadent frosting over the warm brownies and spread it evenly. Allow the brownies to cool completely so the frosting sets just right before slicing and serving.
How to Serve Lunch Lady Brownies Recipe
Garnishes
These brownies are heavenly on their own, but if you’re looking to add a fun touch, try sprinkling mini chocolate chips, chopped nuts, or a light dusting of powdered sugar on top just before serving. Fresh berries or a dollop of whipped cream beside them can also elevate presentation and flavor.
Side Dishes
Pair these brownies with a scoop of creamy vanilla ice cream or a cold glass of milk for a classic combo. For adults, a drizzle of coffee or a shot of espresso on the side complements the deep chocolate notes beautifully.
Creative Ways to Present
Consider cutting your brownies into fun shapes using cookie cutters for parties or layering them in dessert jars with whipped cream and fruit for individual servings. Wrapping a slice in parchment tied with a ribbon makes a charming, delicious gift for friends and family.
Make Ahead and Storage
Storing Leftovers
If you have any leftovers (though it’s hard not to!), keep them in an airtight container at room temperature for 3 to 4 days. This will preserve both the moist texture of the brownies and the creamy frosting, keeping each bite just as delightful as the first.
Freezing
You can freeze leftover brownies for longer storage. Wrap individual pieces tightly in plastic wrap and place them in a freezer-safe container or bag. They can be frozen for up to 3 months without losing that lovely homemade taste and texture.
Reheating
When you’re ready to enjoy frozen brownies, simply thaw them at room temperature. For a freshly-baked warmth, pop a piece in the microwave for about 10 to 15 seconds. That little burst of heat brings back the gooey sensation and melts the frosting just right.
FAQs
Can I substitute unsalted butter for salted butter?
Absolutely! If you’re using unsalted butter, just add a pinch of salt to the batter and frosting to maintain the same flavor balance. The salted butter gently enhances the chocolate, so a little salt goes a long way.
What if I don’t have a stand mixer?
No worries at all! You can easily mix these brownies by hand with a sturdy whisk or wooden spoon. Just be sure to blend the butter and cocoa really well and mix gently once the eggs go in to keep the batter thick and fudgy.
How do I know when the brownies are done baking?
Use a toothpick inserted in the center as your guide. When it comes out clean or with just a few moist crumbs (but not wet batter), your brownies are baked perfectly. Remember, slight underbaking leads to fudgier brownies if you prefer.
Can I use a different type of milk in the frosting?
Yes! While 2% milk works beautifully for a creamy texture, you can substitute whole milk, almond milk, or oat milk. Just keep in mind that thinner milk may make the frosting a bit softer, so adjust powdered sugar if needed for thickness.
Is it possible to make these brownies gluten-free?
Definitely! Swap out the all-purpose flour for a gluten-free blend that can be substituted cup-for-cup. Just make sure your blend has xanthan gum or a similar binder to maintain the chewy texture you expect in a great brownie.
Final Thoughts
Making the Lunch Lady Brownies Recipe is like inviting a warm hug straight from your kitchen. With its simple ingredients and straightforward steps, you’re set up for a baking win that tastes like a treasured classic. I can’t wait for you to try this recipe—it’s truly a crowd-pleaser that will have everyone asking for seconds and sharing fond memories of lunchroom treats gone gourmet!
“`
Print
Lunch Lady Brownies Recipe
- Prep Time: 15 minutes
- Cook Time: 30 minutes
- Total Time: 1 hour
- Yield: 16 servings
- Category: Dessert
- Method: Baking
- Cuisine: American
Description
These Lunch Lady Brownies feature a rich, fudgy chocolate base topped with a smooth and creamy chocolate frosting. Perfect for any occasion, these brownies balance a dense, moist texture with a luscious, sweet topping that’s easy to prepare and sure to delight a crowd.
Ingredients
Brownies
- 1 cup salted butter, melted
- 1/2 cup unsweetened cocoa powder
- 2 cups all-purpose flour
- 2 cups granulated sugar
- 4 large eggs
- 4 teaspoons vanilla extract
Chocolate Frosting
- 1/4 cup salted butter, softened
- 1/4 cup 2% milk
- 1/4 cup unsweetened cocoa powder
- 3 cups powdered sugar
Instructions
- Preheat and Prepare: Preheat your oven to 350°F (175°C). Line a 9×13-inch baking dish with parchment paper and spray the paper with non-stick spray to ensure easy removal of the brownies. Set aside.
- Mix Brownie Batter: In the bowl of an electric stand mixer fitted with the paddle attachment, combine the melted butter and 1/2 cup of unsweetened cocoa powder. Blend until smooth. Add the flour and granulated sugar, then beat together. Next, add the eggs and vanilla extract and mix just until combined to avoid overmixing, as the batter will be thick.
- Bake the Brownies: Pour the batter evenly into the prepared baking dish and spread it out smoothly. Bake in the preheated oven for 25 to 30 minutes, or until a toothpick inserted into the center comes out clean. Remove from the oven and let the brownies stand for 15 minutes to slightly cool but remain warm for frosting.
- Prepare the Frosting: Beat together the softened butter, 2% milk, 1/4 cup cocoa powder, and powdered sugar until the mixture is smooth and creamy.
- Frost the Brownies: While the brownies are still warm, pour the chocolate frosting over the top and spread evenly. Allow the brownies to cool completely before cutting and serving to ensure the frosting sets well.
Notes
- Do not overmix brownie batter to keep the texture fudgy, not cakey.
- Frost brownies while still warm for easier spreading and better absorption.
- Use parchment paper for easy removal and clean edges.
- Check brownies early at 25 minutes to avoid overbaking.
- Store leftovers in an airtight container at room temperature for up to 3 days or refrigerate for longer freshness.


