
If you’re looking for a delightful, crunchy snack that bursts with fresh flavors, this Mini Veggie Spring Rolls Recipe is an absolute gem to add to your kitchen repertoire. These tiny parcels are packed with colorful veggies, fragrant garlic and ginger, and a touch of savory soy sauce, all wrapped in delicate spring roll wrappers and cooked until perfectly crisp. Whether you’re hosting a casual get-together or simply craving a light yet satisfying bite, these spring rolls are sure to impress with their fantastic texture and vibrant taste.
Ingredients You’ll Need
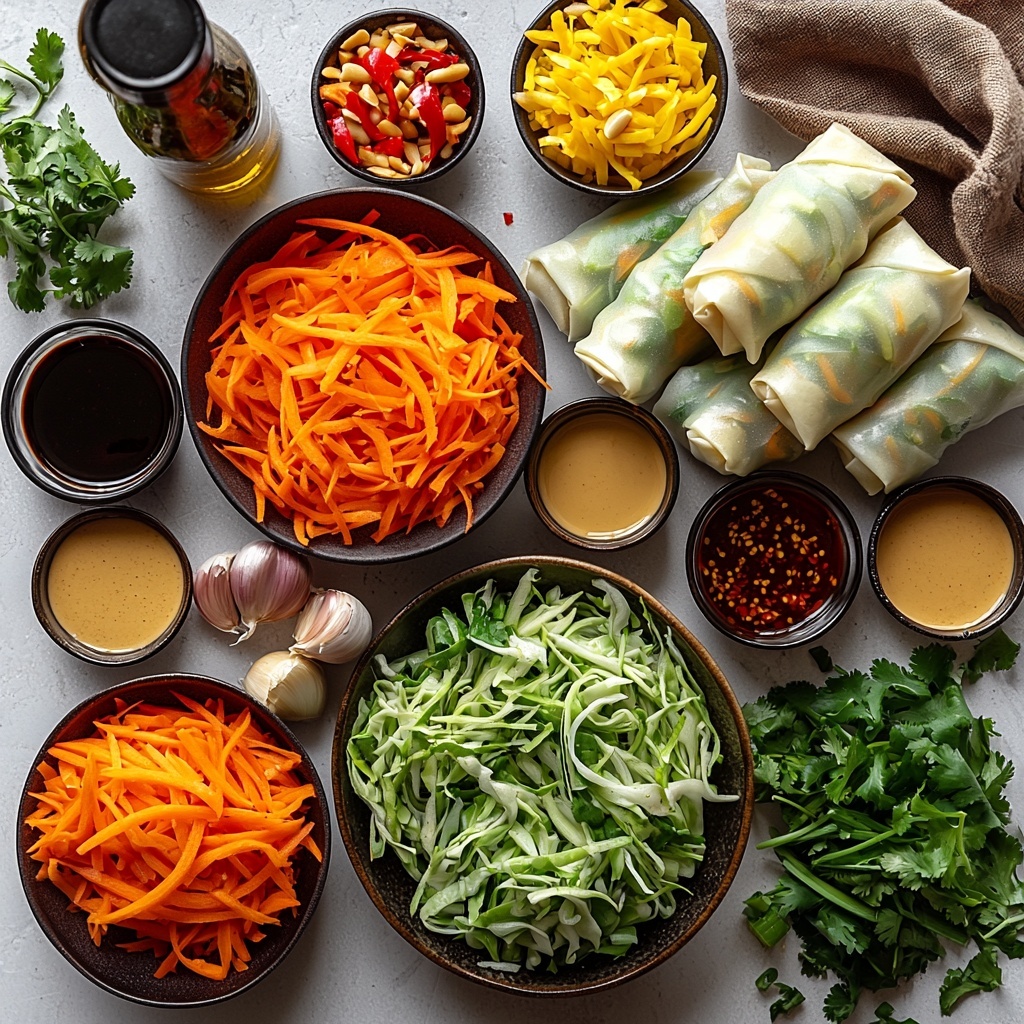
Gathering simple and fresh ingredients is key to making these Mini Veggie Spring Rolls Recipe come alive. Each component plays an important role, contributing to the roll’s crunchy texture, colorful appearance, and delicious flavor balance that makes every bite so irresistible.
- Shredded carrots: Adds sweetness and a lovely crunch.
- Finely chopped bell peppers: Brings vibrant color and a mild tang.
- Shredded cabbage: Offers bulk with a crisp, fresh bite.
- Chopped green onions: Gives a gentle sharpness and depth of flavor.
- Minced garlic: Provides aromatic warmth that wakes up the senses.
- Grated ginger: Adds a subtle zing and brightness.
- Soy sauce: Supplies the salty, umami backbone to the filling.
- Spring roll wrappers: The thin, delicate shell that crisps up beautifully.
- Oil for frying or vegetable oil spray: Essential for achieving a crispy outer layer.
- Dipping sauces (optional): Favorites like sweet chili, soy, or peanut sauce complement the rolls perfectly.
How to Make Mini Veggie Spring Rolls Recipe
Step 1: Prepare the Filling
Start by combining all your fresh veggies and aromatics in a large bowl. Mix the shredded carrots, finely chopped bell peppers, cabbage, green onions, minced garlic, grated ginger, and a splash of soy sauce. Stir everything thoroughly so the flavors meld and the veggies are evenly coated—this mixture forms the flavorful heart of your spring rolls.
Step 2: Set Up Your Wrapper
Place one spring roll wrapper on a clean, flat surface with a corner pointing toward you, making a diamond shape. This orientation makes it easier to roll and seal, helping you achieve those perfect mini spring roll shapes that are so fun to eat.
Step 3: Add the Filling
Scoop about 2 to 3 tablespoons of your delicious vegetable mixture onto the bottom third of the wrapper, near the corner closest to you. Don’t overfill—it’s all about balance to get a neat roll without it bursting during cooking.
Step 4: Roll and Seal
Fold the bottom corner over the filling, then tuck the side corners inward, folding snugly to enclose the veggies. Roll it upward tightly until you reach the top corner. Use a dab of water to moisten the edge and seal your mini spring roll so everything stays secure while cooking.
Step 5: Repeat the Process
Continue rolling the rest of your vegetable filling and wrappers until you have a batch of ready-to-cook mini spring rolls. Each one will be a crispy little bundle of joy waiting to be fried or baked.
Step 6: Cook Your Spring Rolls
Heat oil in a large skillet over medium heat for frying, or preheat your oven to 400°F (200°C) if baking. For frying, carefully add rolls and cook each side for 2 to 3 minutes until golden brown and crunchy. For baking, place them on a parchment-lined sheet, spray lightly with oil, and bake for 15 to 20 minutes until beautifully crisp.
Step 7: Drain and Serve
Once cooked, transfer the spring rolls onto paper towels to drain excess oil if fried. Serve them warm, paired with your favorite dipping sauces for a charming and delicious experience.
How to Serve Mini Veggie Spring Rolls Recipe
Garnishes
Adding fresh garnishes like chopped cilantro, thinly sliced red chilies, or a sprinkle of toasted sesame seeds can elevate your Mini Veggie Spring Rolls Recipe. These little touches add fresh bursts of flavor and make the dish visually appealing when served.
Side Dishes
These spring rolls shine best when accompanied by light, complementary side dishes like a crisp Asian slaw, steamed jasmine rice, or even a refreshing cucumber salad. These sides balance the richness of the crispy rolls without overpowering their delicate flavors.
Creative Ways to Present
Try serving your Mini Veggie Spring Rolls Recipe on a large platter lined with banana leaves for an exotic touch, or stack them in a pyramid shape on a beautiful serving board. Pair with small dipping bowls for sauces and watch your guests delight in grabbing these crunchy bites with their hands.
Make Ahead and Storage
Storing Leftovers
If you happen to have leftovers, store your cooled Mini Veggie Spring Rolls in an airtight container lined with paper towels to keep them from becoming soggy. They’ll stay fresh for up to two days when refrigerated.
Freezing
These rolls freeze wonderfully. Arrange them in a single layer on a baking sheet, freeze until firm, then transfer to a freezer bag. When you’re ready, cook them straight from frozen by baking or frying a few extra minutes to get that crispness back.
Reheating
Reheat your Mini Veggie Spring Rolls Recipe in a preheated oven at 375°F (190°C) for about 10 minutes or until crispy again. Avoid microwaving, as that tends to make the wrappers soggy and less enjoyable.
FAQs
Can I use other vegetables in the filling?
Absolutely! Feel free to experiment with shredded mushrooms, bean sprouts, or finely chopped green beans. Just make sure to keep the filling dry and avoid watery veggies.
Is there a vegetarian or vegan version of this recipe?
This Mini Veggie Spring Rolls Recipe is naturally vegan and vegetarian-friendly as it’s packed with fresh vegetables and uses soy sauce in place of animal-based seasonings.
Can I bake the spring rolls instead of frying?
Yes, baking is a fantastic alternative for a lighter version. Just spray the rolls lightly with oil and bake until crispy, usually around 15-20 minutes at 400°F.
What dipping sauces go best with these spring rolls?
Sweet chili sauce, soy sauce, and peanut sauce are all classic and tasty companions. You can even mix a bit of lime juice and chopped herbs into a simple dipping sauce for a fresh twist.
How do I prevent the wrapper from tearing?
Make sure your wrappers are fresh and pliable. If they start to dry out, cover them with a damp cloth while you work to keep them soft and easier to roll.
Final Thoughts
There’s something truly satisfying about biting into crispy, flavor-packed Mini Veggie Spring Rolls Recipe that you made yourself. They’re versatile, simple to prepare, and perfect for any occasion when you want to impress with minimal fuss. I can’t wait for you to try this recipe and enjoy these crunchy little delights as much as I do!
Print
Mini Veggie Spring Rolls Recipe
- Prep Time: 15 minutes
- Cook Time: 10 minutes (frying) or 15-20 minutes (baking)
- Total Time: 25-35 minutes
- Yield: Approximately 20 mini spring rolls
- Category: Appetizer
- Method: Frying
- Cuisine: Asian
- Diet: Vegetarian
Description
These Mini Veggie Spring Rolls are a delightful and healthy appetizer featuring a colorful mix of shredded carrots, bell peppers, cabbage, green onions, garlic, and ginger wrapped in crispy spring roll wrappers. Perfect for frying or baking, they make an incredible snack or party treat paired with your favorite dipping sauces.
Ingredients
Vegetable Filling
- 1 cup shredded carrots
- 1 cup finely chopped bell peppers (any color)
- 1 cup shredded cabbage
- ½ cup chopped green onions
- 1 tablespoon minced garlic
- 1 teaspoon grated ginger
- 1 tablespoon soy sauce
Spring Rolls
- 1 package spring roll wrappers
- Oil for frying (or vegetable oil spray for baking)
- Optional: dipping sauces (sweet chili sauce, soy sauce, or peanut sauce)
Instructions
- Prepare the Vegetable Filling: In a large bowl, combine shredded carrots, finely chopped bell peppers, shredded cabbage, chopped green onions, minced garlic, grated ginger, and soy sauce. Mix well until all ingredients are evenly coated to create a flavorful filling.
- Lay Out the Wrapper: Place a spring roll wrapper on a clean, flat surface with one corner pointing towards you, forming a diamond shape to make rolling easier.
- Add the Filling: Spoon about 2-3 tablespoons of the prepared vegetable mixture onto the bottom third of the wrapper, ensuring enough space to fold and seal the roll.
- Roll the Spring Roll: Fold the bottom corner over the filling, then fold the side corners inward carefully. Continue rolling tightly upwards until you reach the top corner. Seal completely with a little water to secure the roll.
- Repeat Wrapping: Continue the wrapping process with the remaining wrappers and vegetable filling until all rolls are assembled.
- Heat the Cooking Medium: For frying, heat oil in a large skillet over medium heat until hot. For baking, preheat your oven to 400°F (200°C) and prepare a baking sheet lined with parchment paper.
- Cook the Spring Rolls: If frying, carefully place the spring rolls into the hot oil and fry for 2-3 minutes per side or until golden brown and crispy. If baking, place the rolls spaced evenly on the baking sheet, lightly spray with vegetable oil, and bake for 15-20 minutes until crisp and golden.
- Drain and Serve: Once cooked, remove the spring rolls and drain on paper towels if fried. Serve warm alongside optional dipping sauces such as sweet chili sauce, soy sauce, or peanut sauce for an extra burst of flavor.
Notes
- You can customize the vegetable filling by adding mushrooms, bean sprouts, or tofu for extra texture and protein.
- For a gluten-free option, ensure to use gluten-free soy sauce and wrappers.
- When baking, turning the rolls halfway through will promote even crispiness.
- Spring roll wrappers are delicate—handle with care to avoid tearing.
- Store any leftover uncooked filling in the refrigerator and use within two days for optimal freshness.


