“`html
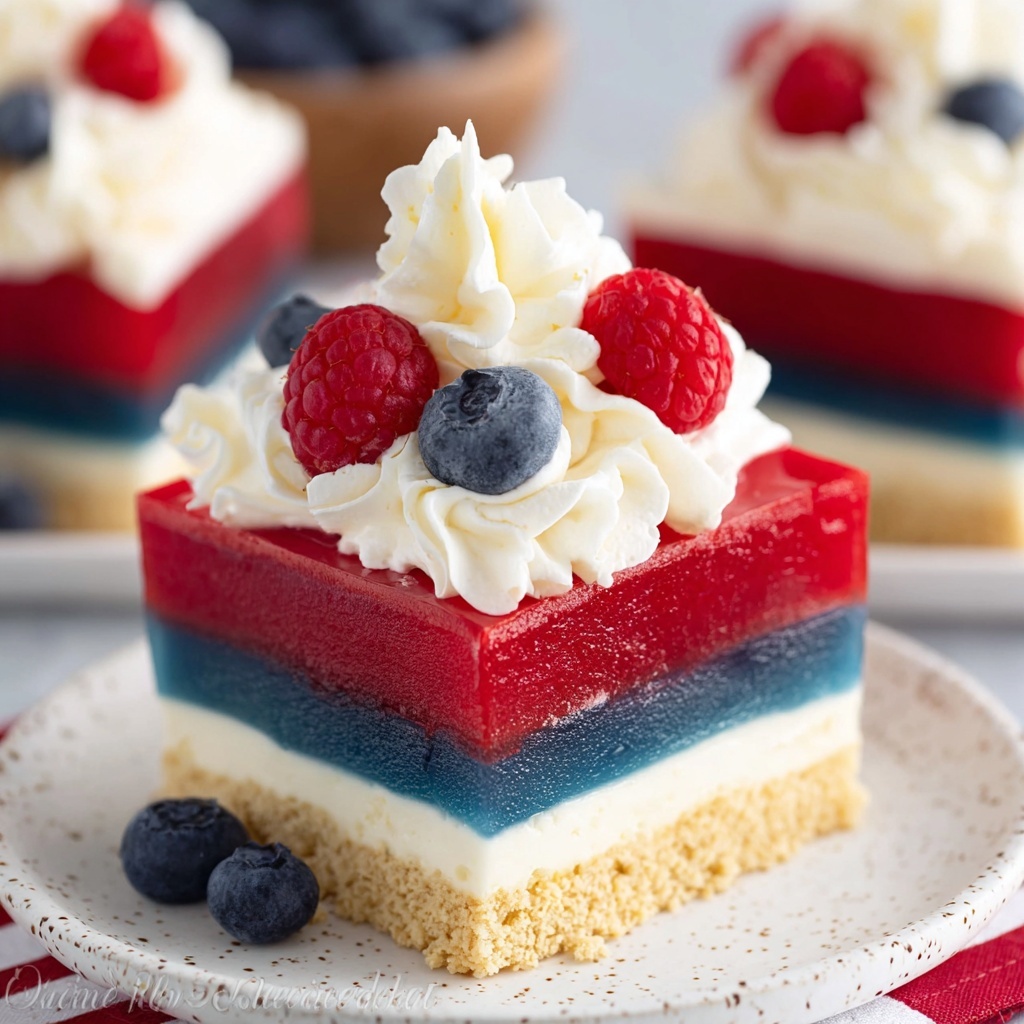
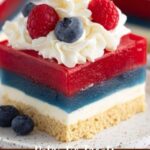
If you’re looking for a dessert that’s as delightful to look at as it is to eat, this Red, White, and Blue Mini Cheesecakes Recipe is a total winner. Bursting with patriotic colors and rich, creamy layers, these mini cheesecakes bring a fun and festive vibe to any gathering, from backyard barbecues to holiday celebrations. They’re perfectly portioned, easy to make, and boast a buttery vanilla wafer crust paired with luscious red and blue tinted cream cheese batters that everyone will adore. Trust me, once you try these bite-sized beauties, they’ll quickly become your go-to crowd pleaser!
Ingredients You’ll Need
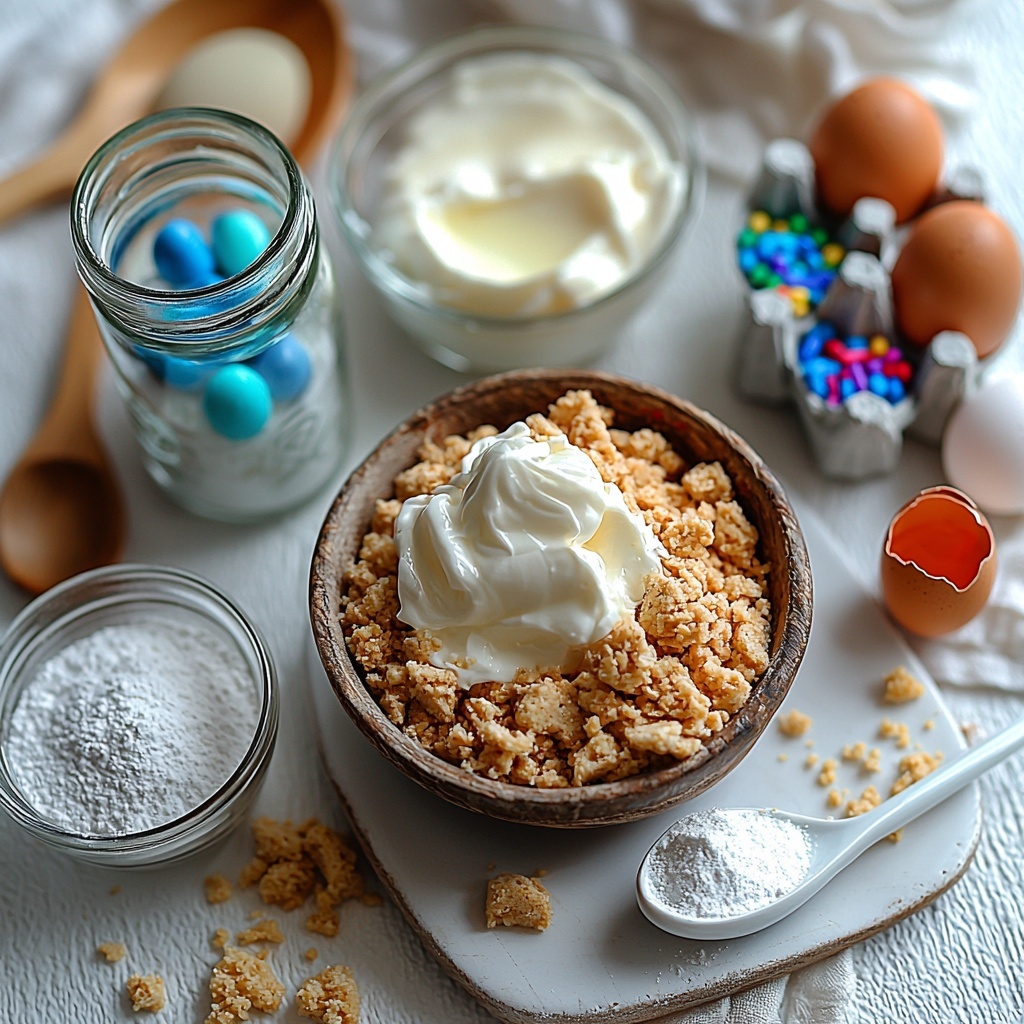
Simple yet essential ingredients come together in this recipe to create the perfect balance of flavor, texture, and vibrant color. Each item plays its role, from the crisp vanilla wafer crumbs that form the base, to the smooth cream cheese filling, and lastly, the pops of red and blue that make these mini cheesecakes unforgettable.
- 1 cup vanilla wafer cookie crumbs: Provides a sweet, buttery crust with just the right crunch for each mini cheesecake.
- 2 tbsp sugar: Adds a touch of sweetness to the crust, enhancing the vanilla flavor.
- 4 tbsp butter, melted: Binds the crust crumbs together while giving a rich, luscious mouthfeel.
- 12 oz cream cheese, room temperature: The creamy base for the cheesecake filling, key for that smooth and rich texture.
- 1/2 cup sugar: Sweetens the cheesecake batter perfectly without overpowering the tangy cream cheese.
- 3 tbsp flour: Adds structure to the filling, ensuring each mini cheesecake holds its shape nicely.
- 1/2 cup sour cream: Brings moisture, tanginess, and a velvety texture to the filling.
- 1 1/2 tsp vanilla extract: Infuses the filling with warm, aromatic flavors that tie every bite together.
- 2 eggs: Critical for binding the filling ingredients and helping it set during baking.
- Blue gel icing color: Gives the vibrant blue hue for one of the cheesecake layers without affecting flavor.
- Red gel icing color: Colors another portion of the filling bright red, adding festive flair.
- 1/2 cup heavy whipping cream, cold: Whipped to top the cheesecakes with a light, airy finish.
- 5 tbsp powdered sugar: Sweetens the whipped cream just right.
- 1/2 tsp vanilla extract: Adds subtle vanilla notes to the whipped cream topping.
- Sprinkles: Fun and colorful decorations that bring a playful touch to the completed mini cheesecakes.
How to Make Red, White, and Blue Mini Cheesecakes Recipe
Step 1: Prepare the Crust
Start by preheating your oven to 325°F (163°C) and lining a cupcake pan with liners. Mix the vanilla wafer crumbs, sugar, and melted butter until evenly combined. Press this mixture firmly into the bottoms of each liner to create that irresistible base. Pop the pan into the oven and bake for just 5 minutes, enough to set the crust before cooling while you prepare the filling.
Step 2: Make the Cheesecake Batter
Lower your oven temperature to 300°F (149°C) to ensure a gentle bake. Beat together the cream cheese, sugar, and flour until smooth and lump-free. Add in sour cream and vanilla extract, then beat eggs in one at a time, incorporating fully before the next. This careful mixing keeps your batter perfect—silky and creamy.
Step 3: Color and Layer the Batter
Divide the cheesecake batter evenly among three bowls. Tint one with red gel icing color, another with blue, and leave one portion plain to represent the white layer. The beauty of this step is how these three layers come together in each mini cheesecake to create that iconic red, white, and blue look everyone will love.
Step 4: Assemble and Bake
Carefully layer the three colored batters into each cupcake liner to create a stunning tri-color effect. Bake for 18 to 20 minutes until the cheesecakes are set but still slightly jiggly in the center. Once baked, allow them to cool completely before moving on to the final step.
Step 5: Whip the Topping and Decorate
Whip the cold heavy cream with powdered sugar and vanilla extract until stiff peaks form—that fluffy topping adds the perfect lightness to balance the richness below. Pipe or dollop the whipped cream on each mini cheesecake and finish with festive sprinkles for that extra pop of celebration.
How to Serve Red, White, and Blue Mini Cheesecakes Recipe
Garnishes
These mini cheesecakes look incredible with a simple topping of whipped cream and sprinkles, but feel free to get creative! Fresh berries like blueberries and raspberries can double down on the patriotic theme and add natural sweetness and texture. A small mint leaf can offer a fresh contrast, too.
Side Dishes
Since these cheesecakes are rich and creamy, pairing them with lighter sides like a fresh fruit salad or a crisp green salad with a fruity vinaigrette can balance the meal wonderfully. They’re also fantastic alongside iced coffee or a sparkling lemonade for a festive summer spread.
Creative Ways to Present
Serve these mini cheesecakes on a decorative platter arranged in a flag pattern for an eye-catching centerpiece. Alternatively, place each cheesecake in a small clear cup layered with fresh fruit for a grab-and-go dessert. They’re also charming when tied with a little ribbon around the liner for individual gifts or party favors.
Make Ahead and Storage
Storing Leftovers
Leftover mini cheesecakes should be stored in an airtight container in the refrigerator. This keeps them fresh and creamy for 3 to 4 days while maintaining their beautiful layers and flavors. Just make sure they’re well covered to prevent them from absorbing any fridge odors.
Freezing
If you make extras or want to prepare these ahead of time, they freeze brilliantly. Place cheesecakes on a baking sheet individually and freeze until firm, then transfer to a freezer-safe container with layers separated by parchment paper. They’ll keep well for up to 1 month. Thaw overnight in the fridge before serving for best texture.
Reheating
Since these are chilled cheesecakes, reheating isn’t necessary and can compromise their creamy texture. Instead, allow frozen cheesecakes to thaw slowly in the refrigerator and serve chilled for that perfect smooth consistency.
FAQs
Can I use a different type of cookie for the crust?
Absolutely! While vanilla wafer crumbs give a lovely sweetness and texture, graham crackers or digestive biscuits work well too, adding their own unique flavor to the crust.
Do I have to use gel coloring for the batter?
Gel colors are best because they provide vibrant hues without thinning the batter. Liquid food coloring can be used but may affect the consistency, so use sparingly.
Can I make these mini cheesecakes dairy-free?
Yes, you can substitute dairy products like cream cheese and sour cream with vegan alternatives. Just note the texture and flavor might vary slightly but will still be delicious!
What if I don’t have a cupcake pan?
You can bake these mini cheesecakes in a mini muffin pan or even in silicone molds for easy removal. Just adjust baking time slightly and check for doneness accordingly.
How do I prevent cracking on top of my cheesecakes?
Be careful not to overbake and avoid opening the oven door during baking, as sudden temperature changes can cause cracks. Also, mixing ingredients gently helps maintain a smooth batter.
Final Thoughts
This Red, White, and Blue Mini Cheesecakes Recipe is a fantastic way to brighten up any occasion with its festive colors and irresistible flavors. They’re fun to make, delightful to share, and sure to bring smiles to everyone at your table. I can’t wait for you to try these and enjoy all the creamy, colorful goodness yourself!
“`
Print
Red, White, and Blue Mini Cheesecakes Recipe
- Prep Time: 15 minutes
- Cook Time: 25 minutes
- Total Time: 40 minutes
- Yield: 12 servings
- Category: Dessert
- Method: Baking
- Cuisine: American
Description
These Red, White, and Blue Mini Cheesecakes are a festive, colorful treat perfect for patriotic holidays or any celebration. Featuring a buttery vanilla wafer crust and rich cream cheese filling in vibrant red, white, and blue layers, topped with fluffy whipped cream and sprinkles, these bite-sized cheesecakes are as delicious as they are visually appealing.
Ingredients
Crust
- 1 cup vanilla wafer cookie crumbs
- 2 tbsp sugar
- 4 tbsp butter, melted
Cheesecake Filling
- 12 oz cream cheese, room temperature
- 1/2 cup sugar
- 3 tbsp flour
- 1/2 cup sour cream
- 1 1/2 tsp vanilla extract
- 2 eggs
- Blue gel icing color
- Red gel icing color
Whipped Cream Topping
- 1/2 cup heavy whipping cream, cold
- 5 tbsp powdered sugar
- 1/2 tsp vanilla extract
- Sprinkles
Instructions
- Preheat oven and prepare pan: Preheat the oven to 325°F (163°C). Line a cupcake pan with paper liners to ensure easy removal and cleaner presentation.
- Prepare crust: In a bowl, mix the vanilla wafer crumbs, sugar, and melted butter until combined. Press this mixture firmly into the bottoms of each cupcake liner to form the crust base.
- Bake crusts: Bake the crusts for 5 minutes to set. Remove from oven and allow to cool. Then reduce oven temperature to 300°F (149°C) for baking the cheesecake filling.
- Make cheesecake batter: In a mixing bowl, beat the cream cheese, sugar, and flour together until smooth and creamy. Add sour cream and vanilla extract, mixing well. Then beat in the eggs one at a time until fully incorporated.
- Color the batter: Divide the cheesecake batter evenly into three separate bowls. Add red gel icing color to one bowl, blue gel icing color to another, and leave the third plain (white) to represent the three colors of the theme.
- Layer batters: Carefully layer the colored batters into the cupcake liners over the baked crust, creating distinct red, white, and blue layers in each mini cheesecake.
- Bake cheesecake: Bake the layered mini cheesecakes at 300°F (149°C) for 18-20 minutes until the centers are set but slightly jiggly. Remove and let cool completely at room temperature.
- Prepare whipped cream topping: In a chilled bowl, whip the cold heavy cream with powdered sugar and vanilla extract until stiff peaks form, creating a light and airy topping.
- Assemble and decorate: Pipe or spoon the whipped cream topping generously onto each cooled mini cheesecake. Finish with colorful sprinkles for a festive look.
Notes
- Ensure cream cheese is at room temperature before mixing to avoid lumps.
- Do not overbake the cheesecakes; they will firm up as they cool.
- You can substitute vanilla wafer crumbs with graham cracker crumbs if preferred.
- Use gel icing colors instead of liquid food coloring for vibrant colors without affecting batter consistency.
- Mini cheesecakes can be stored refrigerated for up to 3 days in an airtight container.


