
“`html
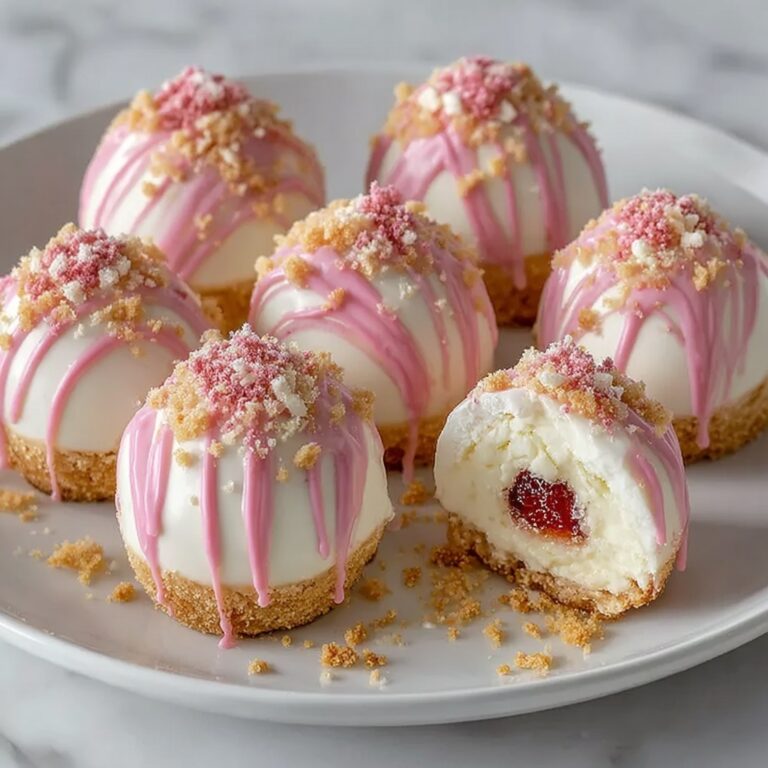
If you’re looking to impress friends or treat yourself to something delightfully fun and indulgent, the Strawberry Crunch Cheesecake Cones Recipe is going to be your new go-to dessert. Imagine the creamy tang of no-bake cheesecake, the juicy freshness of strawberries, all wrapped up in a crisp waffle cone dipped in silky white chocolate and finished with that irresistible strawberry crunch topping. It’s like summer in every bite, combining textures and flavors that make this dessert a total crowd-pleaser and a showstopper for any occasion.

Ingredients You’ll Need
The ingredients for this Strawberry Crunch Cheesecake Cones Recipe are wonderfully simple but absolutely essential. Each one plays a crucial role, from building the luscious cheesecake filling to creating that perfect crunch and stunning presentation.
- 6 waffle cones: The crispy vessel that holds all the deliciousness together with a hint of toasty sweetness.
- 8 oz (225 g) full-fat cream cheese, softened: The creamy base that gives the cheesecake its rich and smooth texture.
- 1/2 cup (100 g) fine granulated sugar: Adds just the right amount of sweetness to balance the tang of the cream cheese.
- 1 cup (240 ml) heavy cream, cold, for whipping: Whipping this to soft peaks creates a light and airy contrast to the dense cream cheese.
- 1 teaspoon (5 ml) pure vanilla extract: Boosts the flavor with warm, fragrant vanilla notes that deepen every bite.
- 1 cup (100 g) finely crushed graham cracker crumbs: Adds a subtle, buttery crunch that complements the creaminess.
- 4 tablespoons (56 g) unsalted butter, melted slightly: Helps bind the graham cracker crumbs and adds richness.
- Fresh strawberries, diced (amount as desired): Bursts of juicy sweetness that brighten the whole dessert.
- Red food coloring, a drop (optional): Enhances the strawberry’s vibrant color for extra visual appeal.
- White chocolate: Melted for dipping the cones, giving them a luxurious, creamy shell.
- Strawberry glaze: Prepared separately, this glaze adds moisture and a tangy-sweet layer inside the cones.
- Strawberry crunch topping: Also prepared separately, this topping provides that addictive crispy texture that brings the cones to life.
How to Make Strawberry Crunch Cheesecake Cones Recipe
Step 1: Prepare the Strawberry Glaze
Start by making your strawberry glaze. This not only infuses fresh, fruity flavor but also keeps the cones moist, so they don’t become soggy or dry. It’s one of those little touches that transform this dessert into something truly special.
Step 2: Create the Strawberry Crunch Topping
Next, prepare your strawberry crunch topping. The contrast of crunchy texture against the smooth cheesecake filling is what elevates this recipe, giving it a delightful balance that keeps every bite interesting and satisfying.
Step 3: Melt the White Chocolate
Melt the white chocolate carefully, following the package instructions. Keep the heat low and stir frequently to achieve a silky smooth consistency. If it hardens too quickly, a quick 10-second zap in the microwave can bring it back to perfect dipping texture.
Step 4: Dip the Waffle Cones
Dip the top of each waffle cone into the melted white chocolate. This not only creates a gorgeous, glossy coating but seals the cone so the filling stays fresh. Tap gently to remove excess chocolate for a neat, even layer.
Step 5: Coat with Strawberry Crunch Topping
Immediately after dipping, roll each cone in the strawberry crunch topping. The fresh white chocolate surface helps the topping stick beautifully, giving you that attractive, textured finish that makes these cones irresistible.
Step 6: Let the Chocolate Set
Place the cones upright on a parchment-lined tray and allow the white chocolate to harden. This takes about 10 minutes. Keeping them upright prevents any mess and ensures the crunch coating stays perfectly intact.
Step 7: Prepare the No-Bake Cheesecake Filling
Mix the cream cheese, sugar, vanilla extract, and cold whipped cream into a smooth, fluffy filling. Transfer this into a piping bag or a zip-top bag with a snipped corner to fill the cones cleanly and easily.
Step 8: Layer the Filling and Strawberries
Fill each cone halfway with the cheesecake mixture, then add a spoonful of strawberry glaze and a few diced strawberries to add bursts of refreshing flavor and lovely texture layers.
Step 9: Complete the Filling
Finish filling the cones with more cheesecake, glaze, and diced strawberries. Be careful not to overfill to avoid any messy overflow, keeping the presentation neat and appetizing.
Step 10: Top with Extra Strawberry Crunch
Sprinkle more strawberry crunch topping on the exposed cheesecake edges for that irresistible finishing touch that amps up the flavor and adds a vibrant pop of texture on the top.
Step 11: Drizzle Extra White Chocolate
Drizzle any remaining melted white chocolate lightly over the cones and add a final dusting of the crunch topping. This step gives an elegant finish and a little extra sweetness without overwhelming the delicate flavors.
Step 12: Serve or Chill
You can serve your gorgeous Strawberry Crunch Cheesecake Cones right away or chill them in an airtight container. These cones stay deliciously fresh and crunchy for up to 3 days in the fridge, making them perfect to prepare ahead of time for special events or treats.
How to Serve Strawberry Crunch Cheesecake Cones Recipe
Garnishes
Fresh mint leaves, extra diced strawberries, or a dusting of powdered sugar all make excellent garnishes to enhance both the look and flavor. Adding a small drizzle of strawberry glaze on the serving plate adds a touch of elegance and extra sweetness.
Side Dishes
Pair these cones with a simple bowl of fresh berries or a scoop of vanilla bean ice cream for a light and refreshing contrast. A cup of hot tea or sparkling lemon water also complements the richness of the cheesecake perfectly.
Creative Ways to Present
Serve the cones upright in a decorative cone stand for a fun, eye-catching display. Alternatively, arrange them in colorful cupcake liners or nestled in a bed of fresh greens or edible flowers for a stunning party platter everyone will admire before diving in.
Make Ahead and Storage
Storing Leftovers
If you have any leftover Strawberry Crunch Cheesecake Cones, store them in an airtight container in the refrigerator. They will keep fresh and maintain their delightful crunch for up to 3 days — just be sure to keep them upright to avoid any mishaps.
Freezing
While these cones are best enjoyed fresh, you can freeze the cheesecake filling separately for up to 1 month. Once ready to serve, thaw the filling completely before assembling the cones and adding the fresh strawberries and crunch topping to maintain their perfect texture.
Reheating
Since this is a no-bake dessert featuring whipped cream and fresh fruit, reheating is not recommended. Instead, enjoy them chilled straight from the fridge for the best taste and texture experience.
FAQs
Can I use chocolate chips instead of white chocolate for dipping?
Absolutely! Milk or dark chocolate chips can be melted and used in place of white chocolate if you prefer a richer or less sweet dip. Just make sure to temper the chocolate properly for a smooth finish.
Is it possible to make this recipe dairy-free?
Yes, you can substitute the cream cheese and heavy cream with plant-based alternatives like cashew cream cheese and coconut cream. Keep in mind the flavor and texture will be slightly different but still delicious.
How do I prevent the waffle cones from getting soggy?
Dipping the cones in melted white chocolate creates a moisture barrier, which is key to keeping the cones crispy. Also, serve or consume the cones within 3 days and store them upright in an airtight container.
Can I prepare the strawberry crunch topping in advance?
Definitely! The strawberry crunch topping can be made ahead of time and stored in an airtight container at room temperature for up to a week. This saves time when assembling your cones.
What if I don’t have a piping bag — any alternatives?
No worries! You can simply use a zip-top plastic bag and snip off a small corner to pipe the cheesecake filling into the cones with control and minimal mess.
Final Thoughts
There’s something truly magical about the Strawberry Crunch Cheesecake Cones Recipe — it’s vibrant, fun, and wonderfully indulgent all at once. Whether for a summer party, a special family treat, or just an everyday dessert that feels a little extra, these cones bring smiles and sweet satisfaction with every bite. Give this recipe a try, and I promise, it will become a beloved favorite in your dessert lineup!
“`
Print
Strawberry Crunch Cheesecake Cones Recipe
- Prep Time: 20 minutes
- Cook Time: 10 minutes (setting time for chocolate)
- Total Time: 30 minutes
- Yield: 6 servings
- Category: Dessert
- Method: No-Cook
- Cuisine: American
- Diet: Vegetarian
Description
Enjoy a delightful twist on classic cheesecake with these Strawberry Crunch Cheesecake Cones. Creamy no-bake full-fat cream cheese filling is layered with fresh strawberry glaze and diced strawberries, all nestled inside crisp waffle cones dipped in white chocolate and coated with a crunchy strawberry topping. Perfect for summer parties or any occasion that calls for a fresh, fruity, and indulgent treat.
Ingredients
Cones and Coatings
- 6 waffle cones
- White chocolate (amount per package directions for melting and dipping)
- 1 cup (100 g) finely crushed graham cracker crumbs
- 4 tablespoons (56 g) unsalted butter, melted slightly
- Strawberry crunch topping (prepared according to linked recipe)
Filling
- 8 oz (225 g) full-fat cream cheese, softened
- 1/2 cup (100 g) fine granulated sugar
- 1 cup (240 ml) heavy cream, cold, for whipping
- 1 teaspoon (5 ml) pure vanilla extract
- Red food coloring, a drop (optional, for enhancing color)
Additional Layers
- Fresh strawberries, diced (amount as desired for layering)
- Strawberry glaze (prepared according to linked recipe)
Instructions
- Prepare the Glaze: Make your strawberry glaze following the provided recipe. This glaze adds fresh flavor and moisture to the cones, preventing dryness and complementing the cheesecake filling.
- Create the Crunch Topping: Prepare the strawberry crunch topping as instructed in the linked recipe. This adds important texture contrast and sweetness to the cones.
- Melt the Chocolate: Melt the white chocolate carefully according to the package directions using low heat to avoid burning. If it hardens prematurely, remelt in 10-second microwave increments until smooth and fluid.
- Dip the Cones: Dip the top portion of each waffle cone into the melted white chocolate. Gently tap off excess chocolate for a neat and even coating.
- Coat with Crunch Topping: Immediately roll the chocolate-coated cone in the strawberry crunch topping to achieve an even layer of crunch for both flavor and visual appeal.
- Set the Cones: Place the dipped and coated cones on a parchment-lined baking sheet. Let the chocolate harden for about 10 minutes, keeping cones upright and spaced to prevent sticking.
- Prepare the Filling: Use a piping bag or a Ziploc bag with a snipped corner to scoop the no-bake cheesecake filling for easy and tidy filling of cones.
- Layer the Filling: Fill each cone halfway with the cheesecake filling, then add a spoonful of strawberry glaze and some diced fresh strawberries on top to build layers of flavor and texture.
- Complete the Filling: Add the rest of the cheesecake filling to fill the cones. Repeat the strawberry glaze and fresh strawberry layering, taking care not to overfill.
- Top with Crunch: Sprinkle additional strawberry crunch topping on the filled cone tops for extra decoration and texture contrast.
- Drizzle with Chocolate: Drizzle leftover melted white chocolate lightly over the cone tops and add some extra strawberry crunch topping to enhance presentation and flavor, avoiding heavy drizzles.
- Serve or Chill: Serve immediately for best freshness or refrigerate the cones in an airtight container for up to 3 days to keep them crunchy and delicious.
Notes
- Ensure the cream cheese is softened to room temperature for smooth filling.
- Use cold heavy cream when whipping to achieve better volume and stiffness.
- Be gentle when dipping cones to avoid breakage and ensure even chocolate coating.
- The strawberry glaze and strawberry crunch topping are essential to add moisture and texture; using prepared recipes as referenced is recommended.
- Store cones upright to prevent tipping and chocolate crack during setting.
- For a more vibrant pink filling, add a drop of red food coloring to the cheesecake mixture.
- Serve cones soon after assembling for the best texture; refrigeration up to 3 days is possible but cones are crispiest fresh.


